Wednesday, 31 August 2016

Data Visualization 101: How to Choose the Right Chart or Graph for Your Data

stock_photo.jpgYou and I sift through a lot of data for our jobs. Data about website performance, sales performance, product adoption, customer service, marketing campaign results ... the list goes on. 

When you manage multiple content assets, such as social media or a blog, with multiple sources of data, it can get overwhelming. What should you be tracking? What actually matters? How do you visualize and analyze the data so you can extract insights and actionable information? 

More importantly, how can you make reporting more efficient when you're busy working on multiple projects at once? Download our free guide here for complete data visualization guidelines and tips.

One of the struggles that slows down my own reporting and analysis is understanding what type of chart to use -- and why. That's because choosing the wrong type of chart or simply defaulting to the most common type of visualization could cause confusion with the viewer or lead to mistaken data interpretation. 

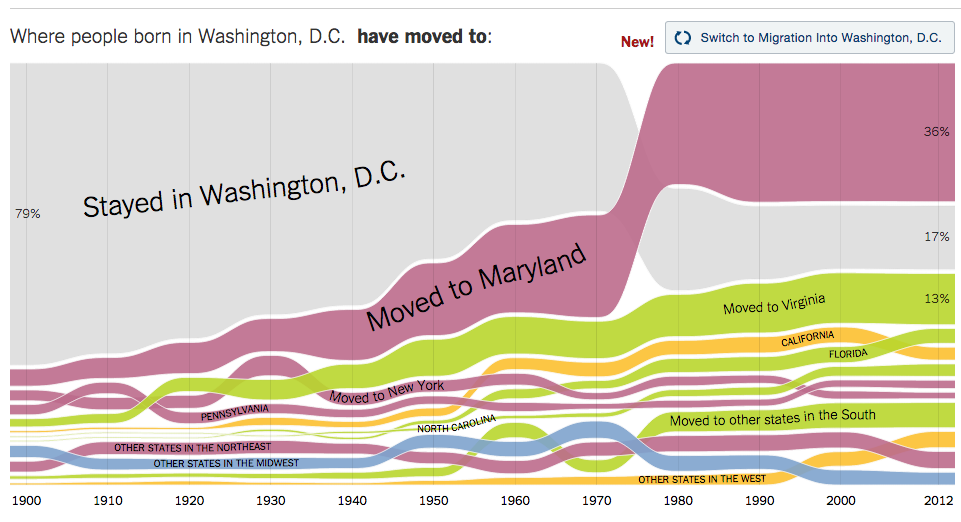
Consider this chart from The New York Times' project on where people born in a state move to. It visualizes a large amount of data accumulated during more than 100 years. Yet, it is easy to understand, and it clearly highlights interesting trends.
dc-migration-nytimes

To create charts that clarify and provide the right canvas for analysis, you should first understand the reasons why you might need a chart. In this post, I'll cover five questions to ask yourself when choosing a chart for your data. Then, I'll give an overview of 13 different types of charts you have at your disposal.

5 Questions to Ask When Deciding Which Chart to Use

1) Do you want to compare values?

Charts are perfect for comparing one or many value sets, and they can easily show the low and high values in the data sets. To create a comparison chart, use these types of graphs:

  • Column
  • Bar
  • Circular Area 
  • Line 
  • Scatter Plot
  • Bullet

2) Do you want to show the composition of something?

Use this type of chart to show how individual parts make up the whole of something, such as the device type used for mobile visitors to your website or total sales broken down by sales rep. 

To show composition, use these charts:

  • Pie
  • Stacked Bar
  • Stacked Column
  • Area
  • Waterfall

3) Do you want to understand the distribution of your data?

Distribution charts help you to understand outliers, the normal tendency, and the range of information in your values.

Use these charts to show distribution:

  • Scatter Plot
  • Line
  • Column
  • Bar

4) Are you interested in analyzing trends in your data set?

If you want to know more information about how a data set performed during a specific time period, there are specific chart types that do extremely well.

You should choose a:

  • Line
  • Dual-Axis Line
  • Column

5) Do you want to better understand the relationship between value sets?

Relationship charts are suited to showing how one variable relates to one or numerous different variables. You could use this to show how something positively effects, has no effect, or negatively effects another variable.

When trying to establish the relationship between things, use these charts:

  • Scatter Plot
  • Bubble
  • Line

13 Different Types of Charts for Analyzing & Presenting Data

To better understand each chart and how they can be used, here's an overview of each type of chart.

1) Column

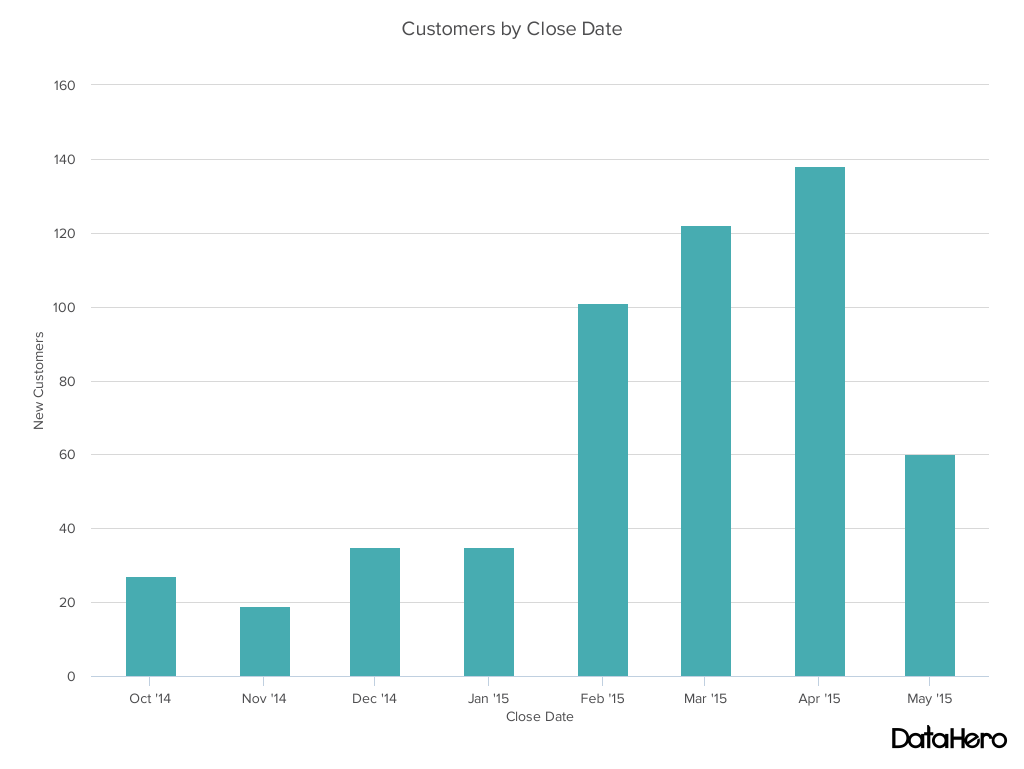
A column chart is used to show a comparison among different items, or it can show a comparison of items over time. You could use this format to see the revenue per landing page or customers by close date. 
column chart customers by close date

Design Best Practices for Column Charts:

  • Use consistent colors throughout the chart, selecting accent colors to highlight meaningful data points or changes over time.
  • Use horizontal labels to improve readability.
  • Start the y-axis at 0 to appropriately reflect the values in your graph.

2) Bar

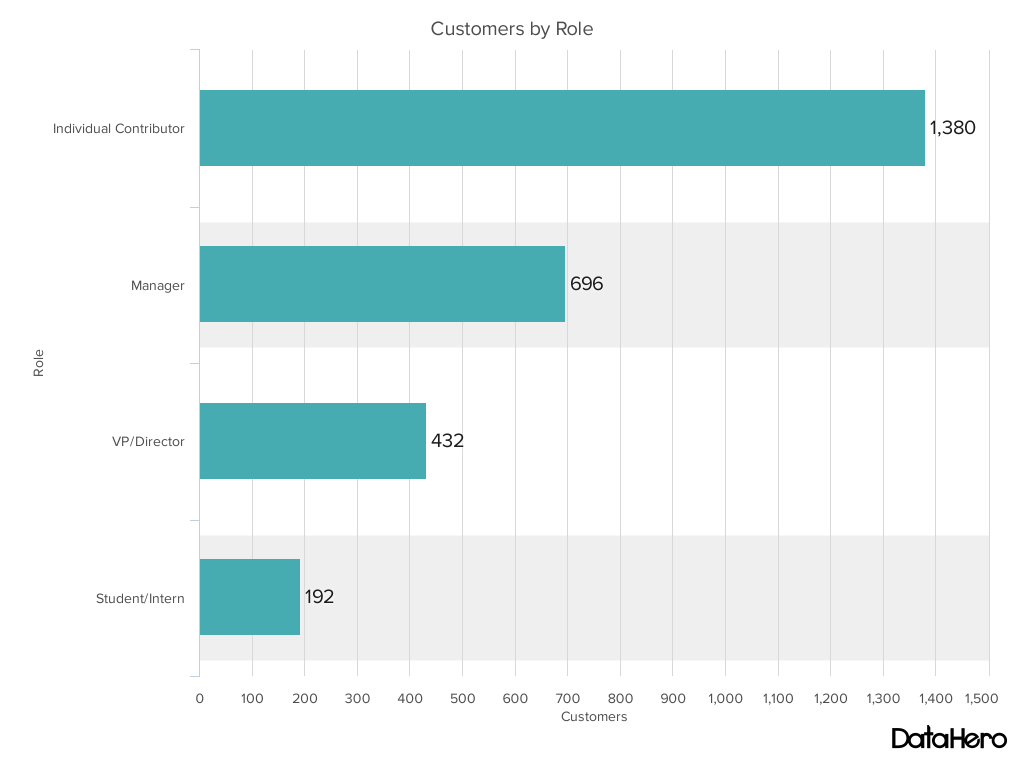
A bar chart, basically a horizontal column chart, should be used to avoid clutter when one data label is long or if you have more than 10 items to compare. This type of visualization can also be used to display negative numbers.
bar chart - customers by role

Design Best Practices for Bar Charts:

  • Use consistent colors throughout the chart, selecting accent colors to highlight meaningful data points or changes over time.
  • Use horizontal labels to improve readability.
  • Start the y-axis at 0 to appropriately reflect the values in your graph.

3) Line

A line chart reveals trends or progress over time and can be used to show many different categories of data. You should use it when you chart a continuous data set.
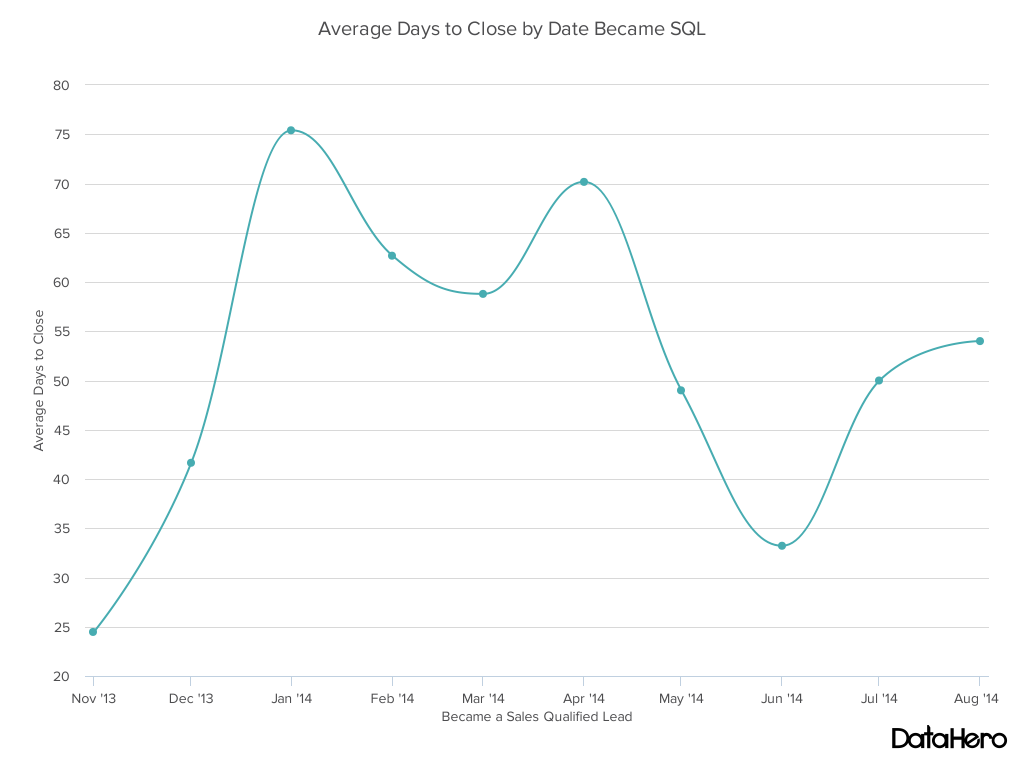
line chart - avg days to close

Design Best Practices for Line Charts:

  • Use solid lines only.
  • Don't plot more than four lines to avoid visual distractions.
  • Use the right height so the lines take up roughly 2/3 of the y-axis' height.

4) Dual Axis 

A dual axis chart allows you to plot data using two y-axes and a shared x-axis. It's used with three data sets, one of which is based on a continuous set of data and another which is better suited to being grouped by category. This should be used to visualize a correlation or the lack thereof between these three data sets. 
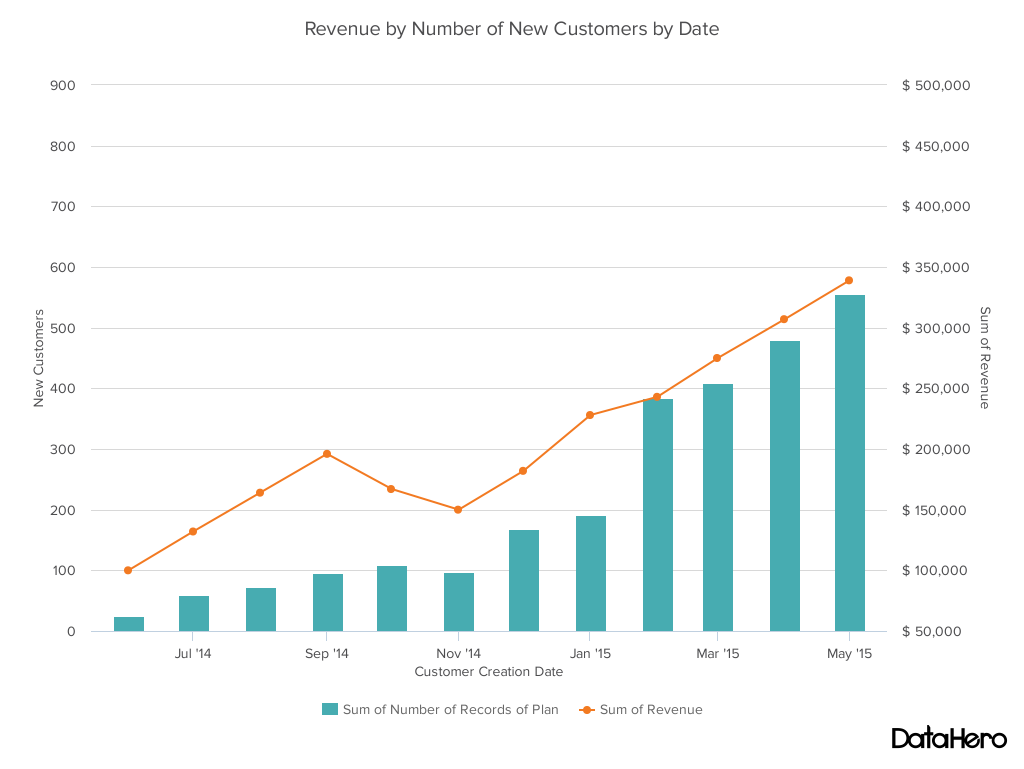
dual axis chart - revenue by new customers

Design Best Practices for Dual Axis Charts:

  • Use the y-axis on the left side for the primary variable because brains are naturally inclined to look left first.
  • Use different graphing styles to illustrate the two data sets, as illustrated above.
  • Choose contrasting colors for the two data sets.

5) Area

An area chart is basically a line chart, but the space between the x-axis and the line is filled with a color or pattern. It is useful for showing part-to-whole relations, such as showing individual sales reps' contribution to total sales for a year. It helps you analyze both overall and individual trend information. 
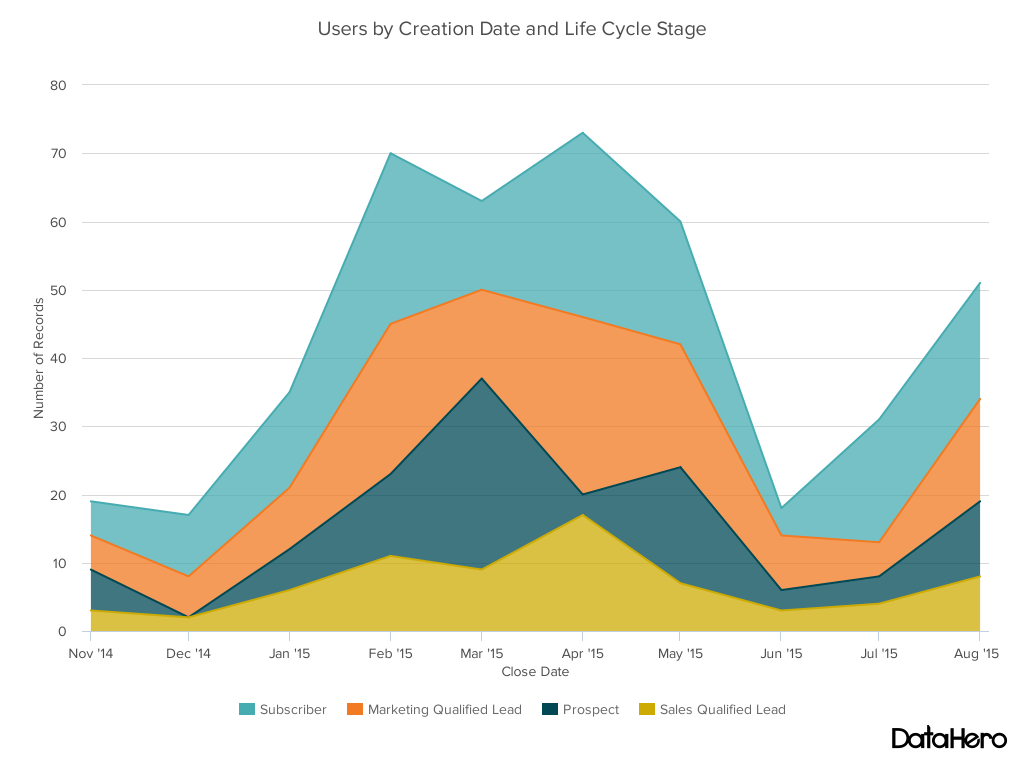
area chart - users by lifecycle stage

Design Best Practices for Area Charts:

  • Use transparent colors so information isn't obscured in the background.
  • Don't display more than four categories to avoid clutter.
  • Organize highly variable data at the top of the chart to make it easy to read.

6) Stacked Bar

This should be used to compare many different items and show the composition of each item being compared. 
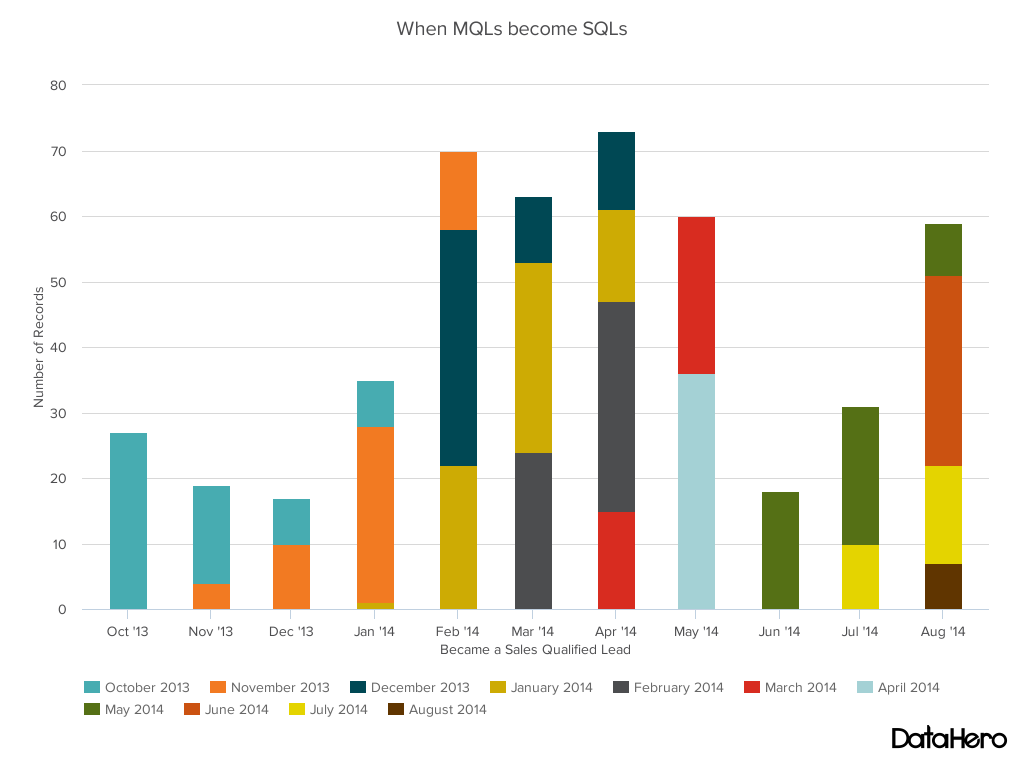
stacked bar -mqls to sqls

Design Best Practices for Stacked Bar Charts:

  • Best used to illustrate part-to-whole relationships.
  • Use contrasting colors for greater clarity.
  • Make chart scale large enough to view group sizes in relation to one another.

7) Pie

A pie chart shows a static number and how categories represent part of a whole -- the composition of something. A pie chart represents numbers in percentages, and the total sum of all segments needs to equal 100%. 
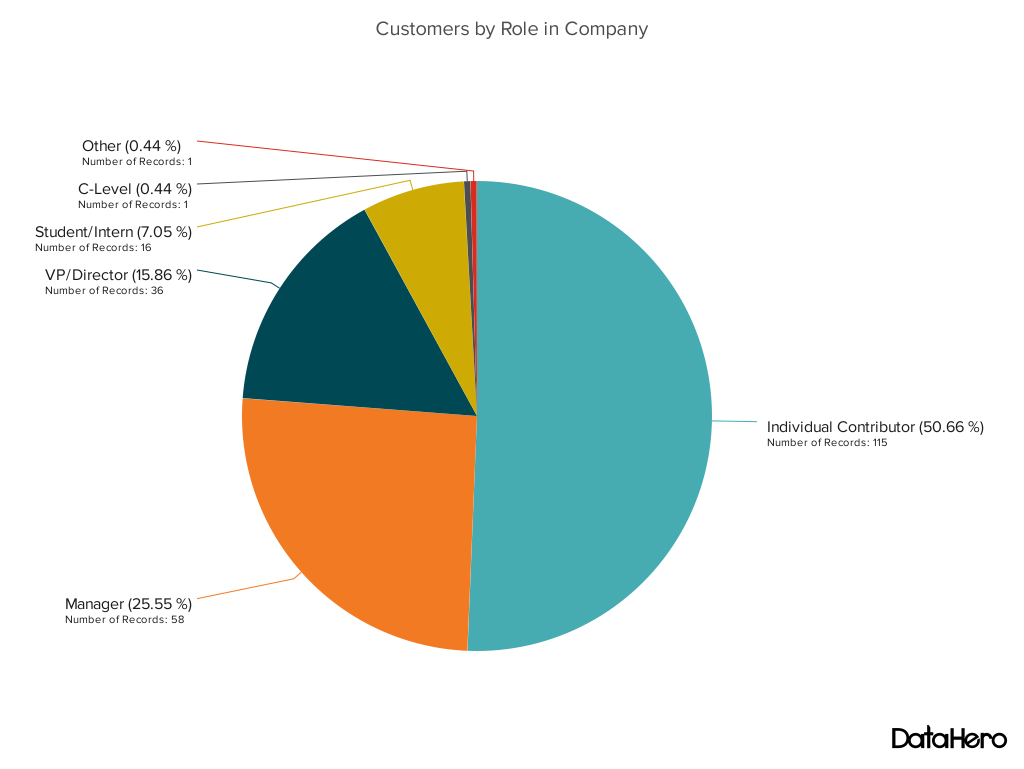
pie chart - customers by role

Design Best Practices for Pie Charts:

  • Don't illustrate too many categories to ensure differentiation between slices.
  • Ensure that the slice values add up to 100%.
  • Order slices according to their size.

8) Scatter Plot

A scatter chart will show the relationship between two different variables or it can reveal the distribution trends. It should be used when there are many different data points, and you want to highlight similarities in the data set. This is useful when looking for outliers or for understanding the distribution of your data. 
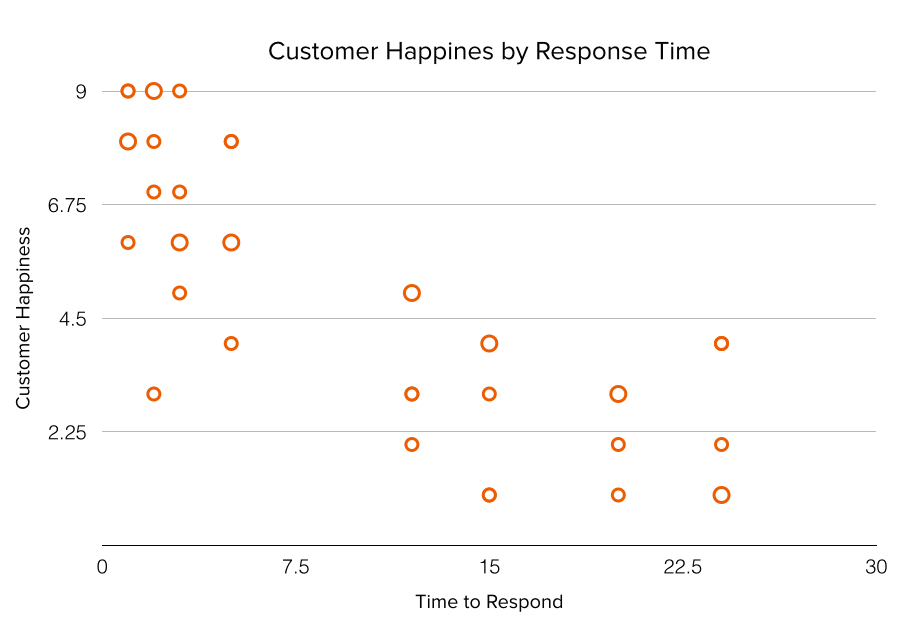
scatter-plot-customer-happines.png

Design Best Practices for Scatter Plots:

  • Include more variables, such as different sizes, to incorporate more data.
  • Start y-axis at 0 to represent data accurately.
  • If you use trend lines, only use a maximum of two to make your plot easy to understand.

9) Bubble

A bubble chart is similar to a scatter plot in that it can show distribution or relationship. There is a third data set, which is indicated by the size of the bubble or circle. 
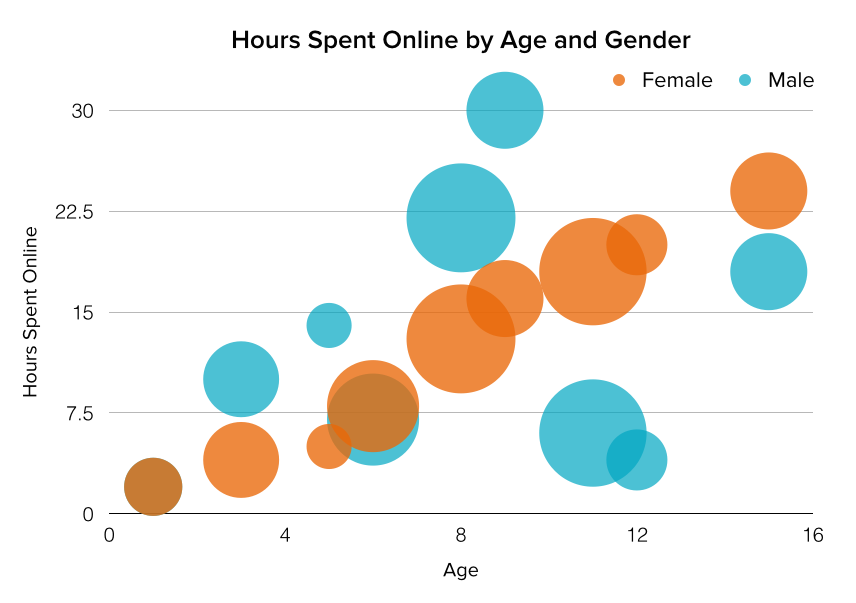
bubble chart

Design Best Practices for Bubble Charts:

  • Scale bubbles according to area, not diameter.
  • Make sure labels are clear and visible.
  • Use circular shapes only.

10) Waterfall

A waterfall chart should be used to show how an initial value is affected by intermediate values -- either positive or negative -- and resulted in a final value. This should be used to reveal the composition of a number. An example of this would be to showcase how overall company revenue is influenced by different departments and leads to a specific profit number. 
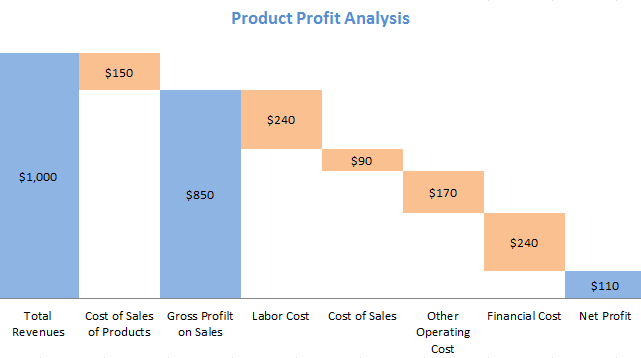
 waterfall-chart

Chart via Baans Consulting

Design Best Practices for Waterfall Charts:

  • Use contrasting colors to highlight differences in data sets.
  • Choose warm colors to indicate increases and cool colors to indicate decreases.

11) Funnel

A funnel chart shows a series of steps and the completion rate for each step. This can be used to track the sales process or the conversion rate across a series of pages or steps.
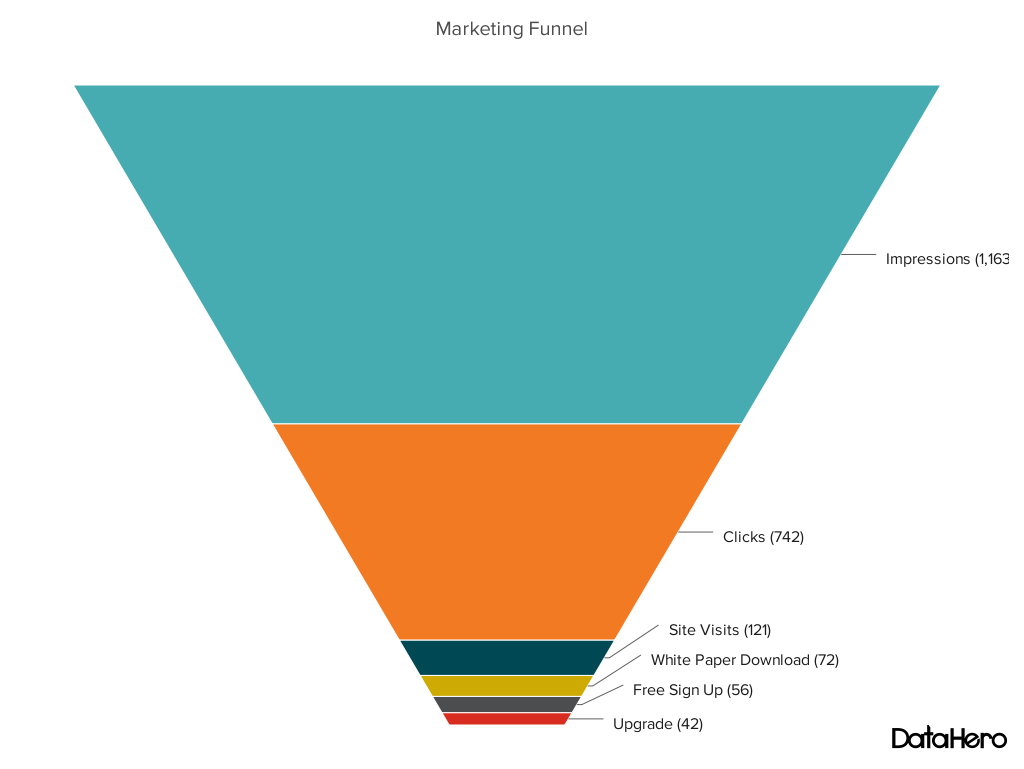
funnel chart - marketing

Design Best Practices for Funnel Charts:

  • Scale the size of each section to accurately reflect the size of the data set.
  • Use contrasting colors or one color in gradating hues, from darkest to lightest as the size of the funnel decreases.

12) Bullet

A bullet graph reveals progress toward a goal, compares this to another measure, and provides context in the form of a rating or performance.

bullet-graph3.png

Design Best Practices for Bullet Graphs:

  • Use contrasting colors to highlight how the data is progressing.
  • Use one color in different shades to gauge progress.

13) Heat Map

A heat map shows the relationship between two items and provides rating information, such as high to low or poor to excellent. The rating information is displayed using varying colors or saturation.  

heat-map-chart

Design Best Practices for Heat Map:

  • Use a basic and clear map outline to avoid distracting from the data.
  • Use a single color in varying shades to show changes in data.
  • Avoid using multiple patterns.

What tips do you have for visualizing data? Check out our ebook on how to use data to win over your audience, and share your tips in the comments below!

Editor's Note: This post was originally published in May 2015 and has been updated for accuracy and comprehensiveness.

free guide to data visualization

  free guide to data visualization E


from HubSpot Marketing Blog http://blog.hubspot.com/marketing/data-visualization-choosing-chart
Via http://blog.hubspot.com/marketing/data-visualization-choosing-chart
Launch Social Media Contests

Social campaigns that happen these days have turned out to be marketing opportunities that are omni channel for businesses to have a better growth and also to develop better brand familiarity. The traditional marketing strategies may turn out to be nothing in front of this new trend tat has conquered the marketing field. The trend has come up due to the changes in our lifestyle.

Why to Launch Social Media Contest?
If the clients brand should be taken part in the contest of social media or it may not seem to be right then you should consider the major advantages that are there which call out for the necessity for executing a social networking campaign that is much successful.

Engagement
Brand engagement is something that is much important measurement considering the running of social media contest. The likes that you get and also the ones who does the likes do not carry the same weightage compared to the people who have got the posts that you made and how they are getting engaged in the contest put forward by you. There is a significant change in the metrics.

Remarketing
When you are asking the email addresses from the users who are participating in the contest that you have put up then it opens an option for you to remarketing the other things that you are going to launch in the future. There are so many possibilities that you get to expand your horizon and make use of whatever you have so that your brand is always getting advantages.

Subscriptions
If the client’s brand is the one which can warrant the subscribers, the contest in social media can act as the best way for gaining many of the new subscriptions. You should encourage the users for joining and subscribing so that they can be part of the contest.

Increasing Sales
Social media contests can give the customers get a chance to be more involved with the brand of yours. This is also a chance for you to gran their attention to the website of your company. If the client that you are dealing with is consumer brand, then the hype that surrounds social media contests and also the new products that are there in the market can have a huge spike in sales which is something that you expect from such kind of contests.

Multi-Channel Promotions
The major aim of the campaign is to increase brand awareness by ensuring that your business actually reach out to newer customer bases. If you want best results from campaign then you should get public relations to be involved in it and also marketing teams to put their efforts in the contests. Syncing efforts across PR and also social are very crucial for getting best from the campaign. When the PR team may be handling the media outreach and also facilitating the launch strategies then it is necessary for being aware about objectives and timeliness.

Implementing Effective Strategy
Before you jump into the campaign, it is necessary for you to do the necessary planning so that you can get it implemented well with all the components in place.

The post Launch Social Media Contests appeared first on Slick Social Media Job's.


from Slick Social Media Job's http://www.slicksocialmediajobs.com/launch-social-media-contests/
Via http://www.slicksocialmediajobs.com/launch-social-media-contests/

8 Time Management Tips to Help You Hit Your Long-Term Deadlines

long_term_deadlines.jpg

While intended to make life easier, sometimes putting together a to-do list can feel like a bigger undertaking than accomplishing the actual tasks at hand. This concept is referred to as the procrastination "doom loop" -- a cycle of putting off tasks, feeling anxiety and guilt, and consequently working with lower productivity and efficiency due to these negative feelings.

This is especially true when it comes to long-term projects, as it can be easy to lose focus and diligence when working toward monthly or quarterly deadlines. But when you're forced to work as your own project manager, organization is the name of the game. 

To help you stay on track and make consistent progress towards your goals, we've put together a list of tools that'll help you complete long-term projects on time without losing motivation or entering the "doom loop." Check them out below.

8 Time Management Tips to Help You Hit Your Long-Term Deadlines

1) Set short-term SMART goals to benchmark your success, and don’t be afraid to adjust them.

If your long-term goal is months away, and the final product is the completion of a large project, such as an ebook publication or new product launch, short-term benchmarks for success will keep you on track and help you stay motivated and productive throughout the process.

We recommend setting SMART goals, which stands for:

Specific

Ensure that your short-term goals are as specific as your final goal. For example, instead of “work on ebook every day for three months,” set a specific goal to complete a certain amount of pages each week. Specific goals are easier to track and report on and more difficult to de-prioritize.

Measurable

Trackable goals allow you to measure your progress toward your final goal and report on your successes and challenges. If your long-term goal is to launch a social media campaign, a measurable short-term goal would be “secure one press mention per week” in lieu of “spread campaign awareness.”

Attainable

According to Harvard Business Review, being challenged is motivating, but working towards goals that you can’t reach is not. Establish goals that you can work to achieve and not be discouraged by. For example, it may not be attainable for your branded hashtag to start #trending on Twitter. Instead, you could aim to get a thought leader in your space to tweet using your hashtag to generate awareness on social media.

Realistic

When you’re strategizing for a big project, plan for the unexpected in the same way that you plan for success. Don’t be dishonest with yourself or your team about your daily productivity potential or how long different processes could take working toward the final goal. With eight hours in a typical workday, make sure you’re not biting off more than you can chew.

Time-Bound

Set mini-deadlines for yourself throughout the project timeline to give you a rough outline of what metrics you should be hitting each week. This approach helps break up your larger project into more achievable sections to prioritize. Balance your deadlines to provide you with motivation and some urgency, but if the deadline is too high-pressure and unrealistic, your creativity and productivity could actually diminish, based on results from a Harvard Business School study.

The key to setting these shorter-term benchmarks is flexibility, according to psychologist Tamar Chansky. Throughout your process, ensure that you are checking to ensure that these smaller goals are staying SMART -- with emphasis on “realistic.”

If you’re falling behind on a deadline or a process is proving more challenging than anticipated, adjust your measures of success to stay on-track.

2) Create a reverse to-do list for your projects.

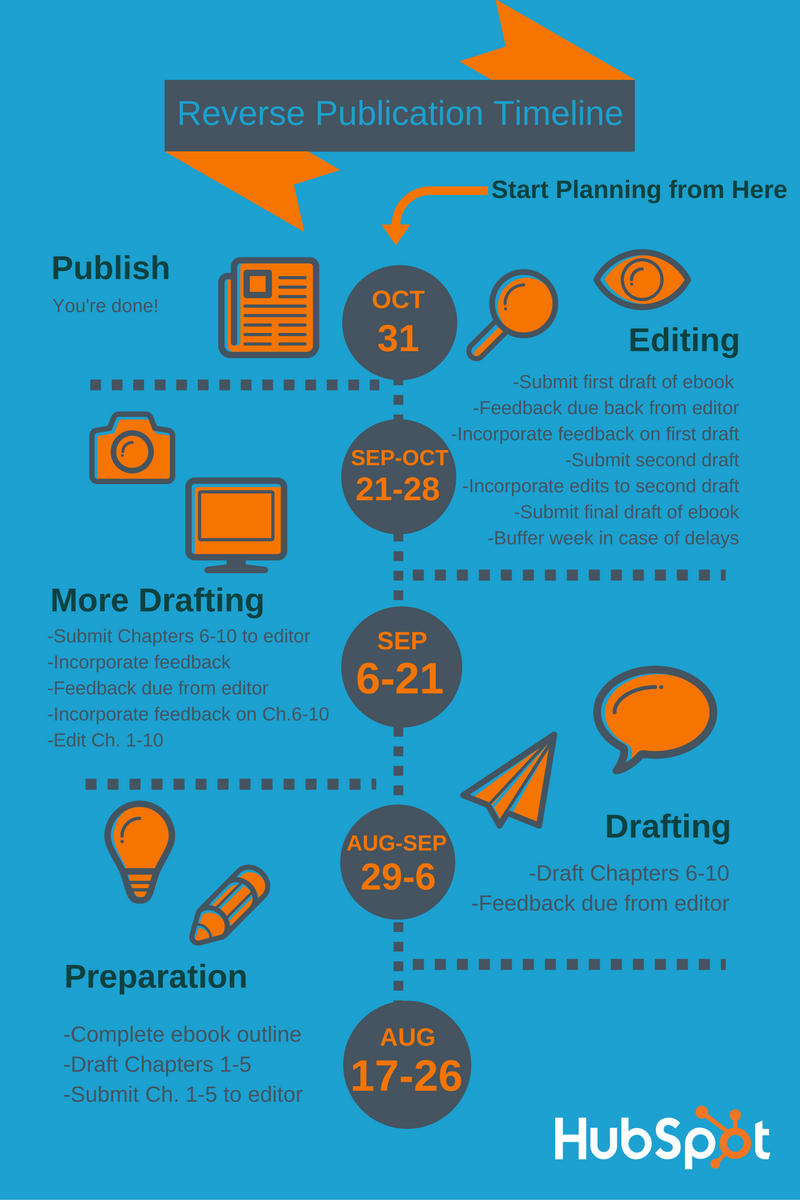
When working on a deadline that is a month or more away, my favorite strategy for project management is a reverse to-do list, which I create by starting with my final, long-term deadline, then working backwards by building in milestones to complete during the process. 

Here's an example of how I might use this approach when planning for an ebook launch:

1-459272722852.png

It’s important to keep updating the deadlines and timeframes as your project evolves to account for any delays or unanticipated challenges to keep yourself on track.

Another key for making this a successful tool is building buffer time into your mini-deadlines to account for those delays. Even if it doesn’t normally take you a full week to incorporate edits, building extra days into each mini-deadline will ensure that your final deadline isn’t delayed by obstacles earlier in the process.

These mini-deadlines help promote prioritization of important tasks and prevent burnout, according to Harvard Business Review.

3) Create accountability for yourself.

You may be responsible for keeping track of your progress toward achieving your goal, and holding yourself accountable to the timelines and benchmarks you've established will help you stay motivated and positive at work.

Personal accountability leads to increased feelings of workplace satisfaction, creativity, and innovation, and there are a few ways to promote that while working on your long-term project, including:

  • Sharing progress toward goals with others. For some people, being vocal about your goals and progress can make a huge difference. For example, one study found that participants in weight-loss programs are more motivated and likely to succeed if they share progress photos on social media. 
  • Setting up a personal reward system for each benchmark you achieve on the path to project completion. Our brains are wired to be more productive the more we achieve goals and reward ourselves, so be sure to keep progress benchmarks short-term and realistic.
  • Tracking your progress so you can visualize what portion of your project you've successfully completed. Measuring progress helps you to evaluate your weaknesses, celebrate your strengths, and see the bigger picture of how your project is unfolding.
  • Being honest with yourself and your colleagues about your achievements. If you're transparent about what you are (or aren't) able to achieve in a given timeframe, your experience will inform future strategy for long-term projects. This may take the shape of an informal conversation or an official performance review; in any case, be positive, focus on your achievements, and maintaining a growth mindset about your weaknesses to continually identify ways to improve and continue to excel.

4) Use a responsive to-do list.

If you’re working on a deadline that’s months away, flexibility is a must. You’ll need to be able to multitask, re-prioritize, and press pause on one piece of your project to focus on another depending on your organization’s needs. Responsive to-do lists and organizational tools are helpful ways to keep track of the various elements of a long-term project and to track daily, weekly, and monthly priorities all in one place. Check out tools that allow you to customize different types of lists, such as:

  • Asana allows teams to create collaborative to-do lists and project management lists (Free for up to 15 users; Premium available for $8.33/member/month)
  • Trello allows users to customize the names of their to-do lists, share them among their team members, and assign them to different people using due dates (Free for Basic; $9.99/user/month for Business Class; $20.83/user/year for Enterprise)
  • todoist allows users to share unlimited tasks with colleagues and edit to-do lists offline (Free for Basic; $29/year for Premium)
  • Google Keep is a digital sticky-note system that syncs to Google Drive (Free)

5) Create a schedule where you can be most productive.

Adam Rogers suggests finding your “biological prime time,” as coined by Sam Carpenter, author of Work the System, as key to becoming a more productive writer. This time can vary from person to person, but according to the Harvard Business Review, many traditional work schedules go against our natural circadian sleep rhythms that determine our peak and low energy levels.

Researcher Christopher Barnes learned that workers typically approach peak productivity around 12 p.m. and experience a sharp decline at roughly 3 p.m.. Towards the end of the afternoon, energy starts to return again, with another peak around 6 p.m..

The lesson here? Plan your most important tasks around these energy peaks, and your least important tasks around these lows. Barnes notes that this is not typical of many workers, who spend their mornings responding to emails and completing other administrative tasks, but who don’t start tackling bigger challenges requiring high levels of productivity until they have already missed their 12 p.m. peak and begun approaching the 3 p.m. slump.

Try to create a daily schedule that allows you to get the most out of your high-energy times, and if it operates contrary to the rest of your organization, communicate that with your supervisor.

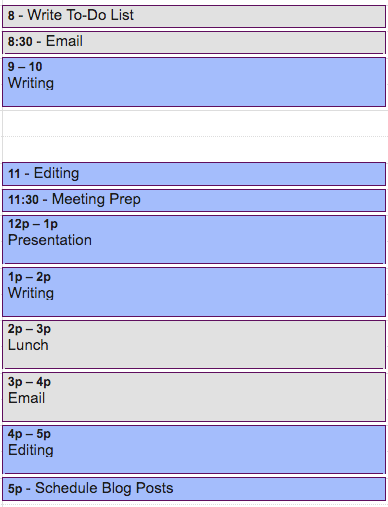
In the example calendar below, events requiring higher levels of productivity and cognitive thought, such as meetings, presentations, and writing, are scheduled around peak productivity times. In contrast, answering emails and eating lunch are scheduled near productivity dips because, unless the emails are time-sensitive, these to-dos aren't typically top-priority and can be scheduled around bigger tasks. 

Sample_Calendar.png

This isn't an exact science, so finding your ideal schedule may require some testing to determine when you're most efficient and when you hit that afternoon slump.

6) Ask for help when you need it.

This is necessary advice for anyone working on a team, as using resources around you is integral to most workplace success, according to Fortune. If you’re being tripped up by an obstacle, are experiencing a production delay, or simply have writer’s block that could throw a wrench in your timeline, and you should use resources around you for guidance and assistance.

This is particularly essential if your deadlines are for finished products months in advance. Missing one internal mini-deadline probably won’t be an insurmountable issue, but if you’re consistently falling behind on benchmarks towards the final goal, staying silent and trying to fix the problem yourself could result in a missed deadline.

Don’t be afraid to reach out to peers or managers for help with brainstorming, editing, or any other roadblock you might be encountering. They would rather you reached out for help before missing a deadline than after missing a deadline, and remember: the most successful people ask for help.

Lean on resources around you to make your life easier and your project better, but remember to be a good coworker, too. When you're asking for help:

  • Outline your SMART goals so your colleagues understand your project.
  • Provide them with resources, such as project specs or prior drafts, to make it easier to help you. 
  • Be specific about what you're asking for and when your deadlines are.
  • Say thank you! Acknowledge their above-and-beyond efforts by letting their supervisor know how they collaborated with you and offering to return the favor with one of their projects.
  • Offer help to colleagues on a regular basis, not just when you need help, to cultivate good faith in your workplace so you're a person people want to help again in the future.

7) Commit to work-life balance.

When your project requires months of hard work, it might feel difficult to step away from your desk or computer at the end of each day with so much left to complete. However, you shouldn’t give in to the temptation of workaholism.

According to the Organization for Economic Cooperation and Development, working long (more than 50) hours can negatively impact your levels of productivity, innovation, and efficiency.

Even if you can’t turn in your final product right away, you shouldn’t stay at work burning the midnight oil trying to get it done early. You’ll work more efficiently by setting daily priorities that allow you to step away from work and recharge once you’ve completed them.

8) Analyze and report on successes and challenges of projects for future goal-setting.

Once you’ve successfully completed a long-term project, don’t move on to the next one without first reflecting on your strategies for project management. What went well, and perhaps more importantly, what didn’t?

If your work is primarily comprised of long-term projects, you will need to continually refine and improve your approach to be as efficient as possible. Document your processes and share them with your team so they can learn from your triumphs and struggles for their projects as well.

Just because your deadline is months away doesn’t mean that you shouldn’t start planning and strategizing for it today. Once you’re ready to dive into a project, learn more about strategies for successful, and not overwhelming, priority-setting and project management.

What are your tips and tricks for project management strategies? Share with us in the comments below!

free productivity tips


from HubSpot Marketing Blog http://blog.hubspot.com/marketing/time-management-tips-long-term-deadlines
Via http://blog.hubspot.com/marketing/time-management-tips-long-term-deadlines

What Do Agency Employees Really Want? [Survey]

Employees are the lifeblood of the agency business, and maintaining a productive and engaged workforce is one of the most challenging aspects of running an agency. But it can be hard for owners to understand the attitudes and goals of an increasingly diverse workforce, and employees may find it difficult to give honest feedback anonymously.

To find out how the attitudes of agency employees shape their goals and opinions about agency work, HubSpot is partnering in a new Agency Employee Attitudes Survey.

The survey is anonymous, and should take less than 15 minutes to complete. Respondents who participate by September 15th can enter to win a $250 Amazon.com gift card.

TAKE THE AGENCY EMPLOYEE SURVEY

The results of this study will be presented at INBOUND 2016 in November.

The Agency Employee Attitudes Survey explores topics such as:

  • How do agency employees view the importance of work, play, and balancing the two?
  • What expectations do they have from their agency employers, and how do they view their own responsibilities?
  • How do they compare the pros and cons of working in an agency versus in a client-side organization?
  • How did they first choose to work in an agency, and how likely would they be to recommend an agency career to others?
  • Which features and benefits of an agency career are most important to them?
  • Do millennial employees actually feel differently about work than other age groups?
  • How can agency owners better understand their employees and offer them features and benefits they will value?

All participants can get free access to the results, which will be shared for the first time at HubSpot’s INBOUND Conference in November 2016.

types-inbound-agencies


from HubSpot Marketing Blog http://blog.hubspot.com/marketing/what-do-agency-employees-really-want-survey
Via http://blog.hubspot.com/marketing/what-do-agency-employees-really-want-survey

Tuesday, 30 August 2016

How to Live Stream Successfully: A Preparation Checklist for Marketers

Live_Streaming_Video_Guide.jpg

Raise your hand if you’d rather watch a video to learn something new than read about it.

Go ahead -- you’re not alone. 59% of executives say they’d rather watch a video than read text, too. And really, that number makes sense -- we are a society of video streamers. (I mean, hello, Netflix.)

That’s great for entertainment value, but what about business? Well, it turns out that video -- especially the live streaming kind -- has a serious positive impact on the brands that use it. According to Tubular Insights, 73% of B2B marketing professionals say that using video has shown a positive ROI. Download our free email tracking template here to easily track your email campaign metrics.  Download our free guide to learn how to use Facebook Live for your business.

But if you’re not sure where to begin, fear not -- we’re here to make sure you don’t just hit the “Live” button on Facebook and stare at the camera like a deer in headlights. Instead, we’ve come up with a comprehensive checklist to help you plan your first -- or next -- live stream. 

How Live Streaming Works

Live streaming is a way to broadcast your events to an online audience. It’s a digital alternative to something like selling tickets to an in-person event, and allows you to reach people near and far with live video.

Brands use live streaming for a few different reasons, but according to a Brandlive survey, 71% of businesses use it to more authentically interact with an audience. So instead of being the proverbial “man behind the curtain,” you’re allowing viewers to put a face (or faces) to your organization's name, all in real time.

Live streaming can be used for a number of different event types, as well. Everyone from the White House, to fashion houses, to chefs have live streamed videos of economy briefings, runway shows, and cooking demos, respectively. Here at HubSpot, we’ve used it for things like interviews with thought leaders. So feel free to be creative -- just make sure you’ve got your bases covered.

How to Live Stream Successfully: A Preparation Checklist for Marketers

1) Plan your live stream like you would any other event.

Think about some of the most popular talk shows. Can you imagine if the guests, sets, lighting and schedules for something like “The Tonight Show” weren’t planned in advance? To say the least, it might be chaotic.

You’ll want to put the same thought and due diligence into your live stream that you’d put into an in-person event of its kind. And you’ll want to have your goals in mind as you begin to make those plans; those will dictate a lot of the logistics.

Who

Knowing your target audience will determine a few pieces of the planning process. If it includes an international population, that should factor into the date and time of your stream -- be sure to think about time zones or holidays that might not be top-of-mind in your home country.

What

Then, think of what category your live stream falls into, and create a title for your event. In case you don’t find any of the above examples fitting to your business, we’ve got some ideas for ways businesses can use live videos.

HubSpot’s Social Media Marketing Manager, Chelsea Hunersen, stresses the importance of thoroughly researching the topic of your live stream in advance.

“Decide important points or stats to hit,” she says. And if you’re going to feature guests, “designate a moderator/host who can make sure these points are hit and can wrap up the conversation if necessary.”

Where

The platform you use -- which we’ll get to in a bit -- can also be dependent on who you want to view the stream. Different audiences use different channels, so you’ll want to pick the one that’s most likely to draw the crowd you want.

Finally, pick an optimal location from which you’ll broadcast your stream. A poor quality video can make someone 62% more likely to have a negative perception of the brand that produced it -- so make sure your setting is conducive to a positive viewing experience. Does it have good lighting? Is it prone to a lot of noise? Is there a chance that your dog walker will barge in yelling, “Who’s a good boy?” loud enough for the entire audience to hear? (Not that that’s happened to me.)

Think of these contingencies, then pick a streaming venue that insulates you from them.

2) Choose your platform.

Here’s where you’ll really need to have your goals in mind, since different platforms can achieve different things.

YouTube Live

YouTube Live Events tend to have “two goals,” says Megan Conley, HubSpot’s Content Marketing Strategist. “Registrants and attendees.”

So, if you’re looking to generate leads -- which 57% of marketing professionals are using video to do -- YouTube Live is one of the best platforms to use.

Here’s how that works. First, if you don’t have one already, you’ll need to create an account on Google, which you’ll then use to create one on YouTube.

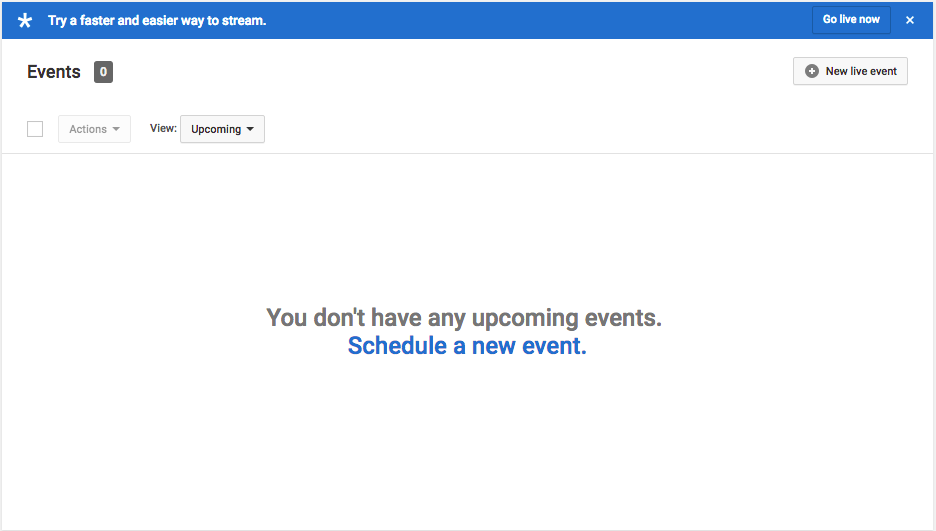
YouTube Live Events

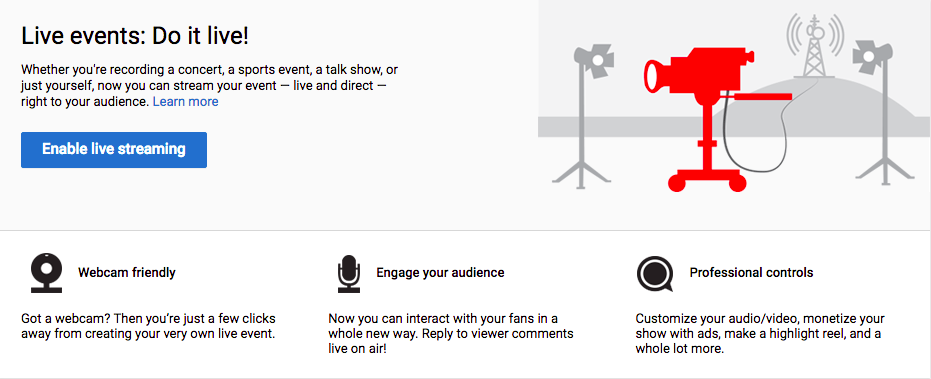
Once that’s done, you can use YouTube’s Live Streaming Events dashboard to schedule a future stream -- just click on “Enable live streaming,” if you haven’t already set it up.

Schedule New Event

Then, click “schedule a new event.”

Select Audience

You’ll need to indicate if you want your event to be public or private -- here’s where you’ll decide how you want to use your live stream to generate leads.

In the image above, I’ve selected “unlisted.” That option accomplishes two things:

  1. I’ll be able to generate a link that attendees will get only after they fill out a registration form.
  2. It won’t stream directly onto my YouTube page.

You also have the option of choosing which type of live stream you want to use:

  1. Quick
  2. Custom

Custom is a better option if you want to get more advanced and have more control over the technology. It lets you use more than one camera, choose your own ingestion bitrate and resolution, and use your own preferred encoding equipment (there’s a pretty good breakdown of your options here).

We’ll talk more about encoding later, but for the purposes of this blog, we’ll be working with the quick option. Quick uses the Google Hangouts On Air technology, which is probably better if you don’t want to get too technically advanced. It lets you use your computer’s camera and microphone, though you do have the option of using an external camera, if you want.

Once you’ve added some tags that describe what your event is about, click “Create Event.”

Events Page

You’ll be taken to your events page -- any live streams that you’ve scheduled will be listed here. It’s also where you’ll get that link to keep behind the form on your landing page. First, click on the title of the stream.

Watch Page

The image above shows your Watch Page, which is the place where your stream will broadcast. Click “share,” and that will generate your event’s URL -- as I mentioned above, you can keep that behind a landing page where attendees fill out a form to register.

Conley says that, generally, this type of live stream is embedded on a thank-you page behind a landing page form. But with this platform, that’s a little trickier -- YouTube doesn’t generate embed codes for live streams unless you have an approved AdSense account linked to your YouTube account.

But fear not -- if you use the HubSpot COS, all you’ll need is the link, and the system will generate the embed code for you.

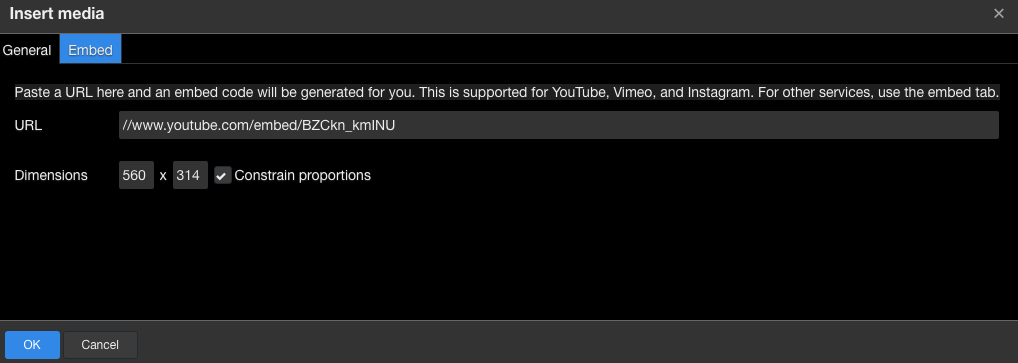
Insert Media

Create Embed Code

Just click “insert media,” paste the link you copied from the Watch Page, and you’re done.

Thank You Page

If embedding isn’t an option, you can still just put a link there -- the embed code just creates a seamless design that you can place right on your thank-you page. Either way, be sure to use the thank-you page as a place to remind your attendees of the date and time of the event.

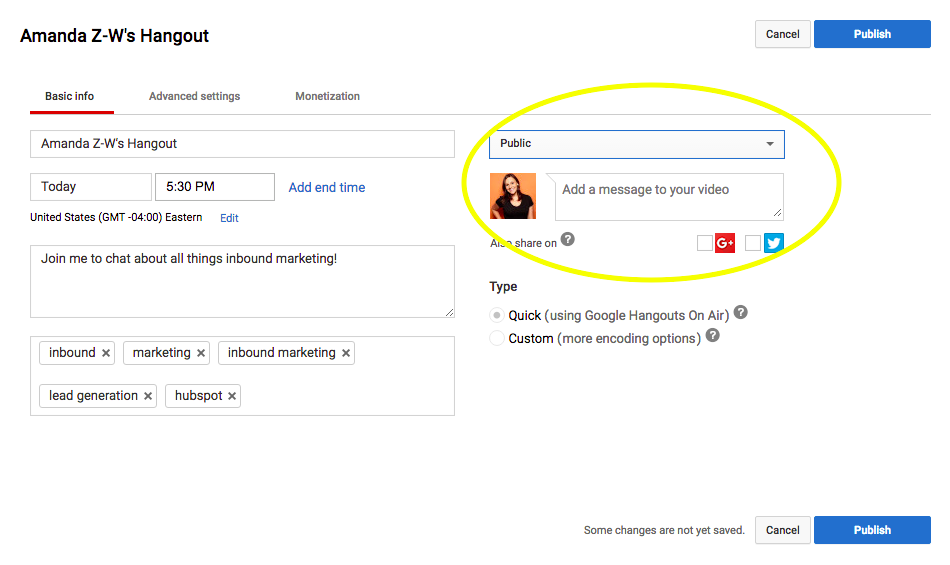
Make Event Public

There’s also the option to make your YouTube Live Event completely open to the public. That’s a good option, Conley says, for a major event that you “want anyone and everyone to be able to find.” But if you make your stream public, she points out, make sure you use the event to promote gated content you want your audience to download.

“An image CTA would do,” she notes, as would holding up clearly-printed short links throughout the stream. (Make sure you have those printed out in advance!) In the image above, you’ll also see that you can add a message to your video -- you can mention your gated content there, too. 

Facebook

Facebook Live has been making quite a few headlines lately, and businesses stand to benefit from it -- the average time spent watching Facebook Live video is three times more than the pre-recorded kind.

This platform is a good choice if you want to use your live stream to generate buzz. In fact, because these videos have been so popular, Facebook is making them appear higher up in people’s News Feeds while streaming live.

Even without pre-registration, you can definitely promote streams on this platform in advance, which we’ll touch on later. In the meantime, if you haven’t used it before, check out my colleague Lindsay Kolowich’s overview of Facebook Live.

The live streaming options certainly don’t end there -- major brands have also used platforms like Periscope, Livestream, and Ustream. They all have their own sets of features and advantages, so definitely take the time to look into which one best suits your needs.

3) Choose your equipment.

When it comes to the actual hardware required for your live stream, some of it is fairly intuitive: A camera is pretty standard, for example, or a device with one installed (like a laptop or phone).

But if you do use your phone, Conley says, be sure to use a tripod. “There’s nothing worse than recording a Facebook Live and having your arm start to fall asleep five minutes into the recording,” she advises. “Use a phone tripod to give your live streaming a professional look.”

Consider how professional you want your sound quality to be, too. Your camera might have its own microphone, but if your setting is more prone to noise, body mics might not be a bad idea, either.

And when you’re using an external camera, says Hunersen, you’ll also need some sort of encoding software (Facebook has a great step-by-step guide to that). That’s what converts the camera footage into a format that your streaming platform understands and can broadcast to viewers. The software you use might depend on your budget, but to get started, check out this one from Adobe.

Also, think about setting up a professional backdrop, like one with your logo. That can help to brand your videos and give them some visual consistency, which is a particularly good practice if you plan to do a lot of live streaming in the future.

Want to take that a step further? “Set up a makeshift studio in your office to speed up the prep time for all of your future recordings,” Conley says. “A beautiful, branded backdrop could be just what your Facebook Live needs to help grab the attention of someone quickly scrolling through their News Feed.”

4) Promote your live stream.

Congratulations! You’ve now completed a lot of the major planning and setup for your live stream. Now, how do you get people to watch it?

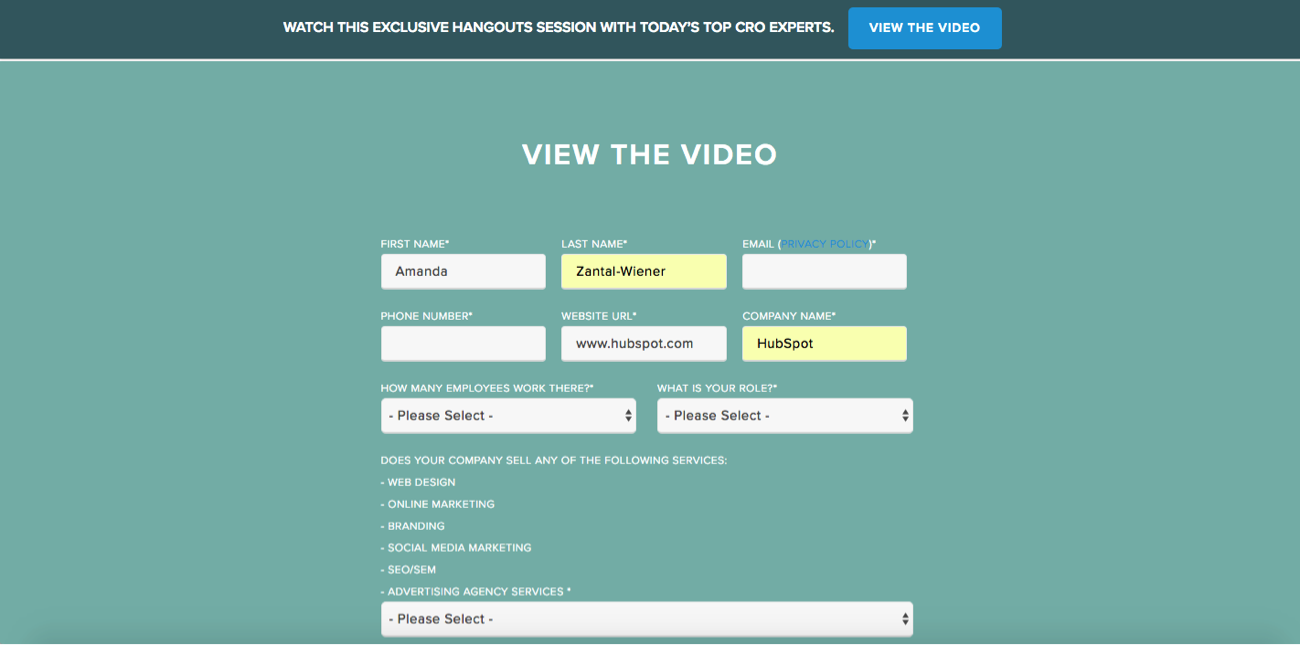
As we’ve covered, using a landing page is a good way to get enrollment on a platform like Hangouts On Air (or, as of September 12th, YouTube Live). Here’s an example of how we recently used one at HubSpot:

HubSpot_CRO_Hangout.png

There’s a clear CTA here -- “View The Video” -- which, when clicked, takes the visitor to a registration form. (And check out this rundown of which channels drive the best conversion rates -- it’s got some tips on getting people to your landing page in the first place.)

Form-2.png

Once someone fills out the form on your landing page, it should lead them to a thank-you page, where you can share some promotional information about the live stream.

HubSpot’s Co-Marketing Demand Generation Manager, Christine White, suggests creating a “Next Steps” section here with actionable items like "add this event to your calendar” and "check back here on [the date of your event],” to remind viewers that’s where they’ll go to view the live stream.

And once you have contact information for your registrants, Conley reminds us, “you can email the people on that list on the day of, and remind them when it’s going to go live.”

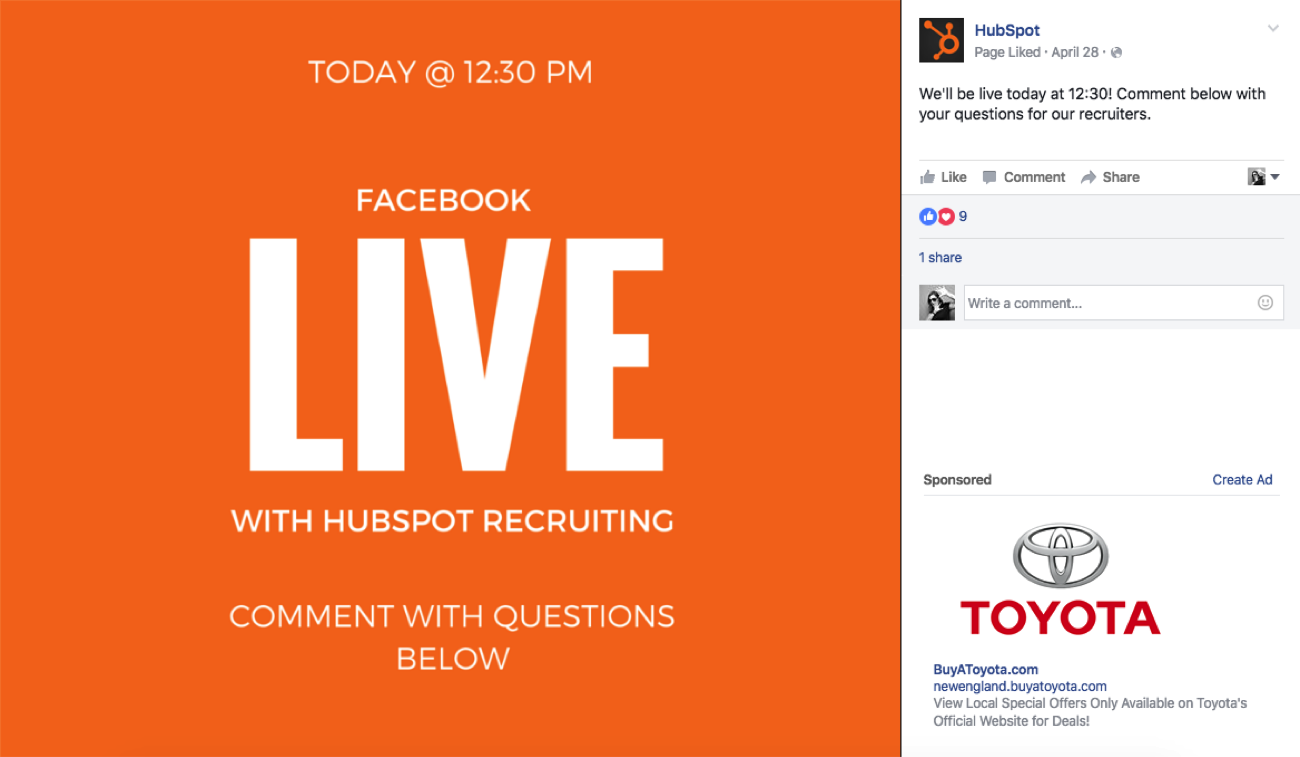
FB_Live_Promo.png

But to promote your Facebook Live stream, says Conley, “It’s really about doing a social image and spreading the word that you are going live at a specific time.”

Don’t rule out using social media to promote live streams on other platforms, too. Some of them, like YouTube, allow you to link your social accounts and push content in multiple places. And if your guests are active on social media, leverage that -- include links to their handles in any related content, and ask them to promote the event with their own networks.

5) Do a dry run.

There’s a reason why we do dress rehearsals. When I was in a high school show choir -- a humiliating but factual piece of history -- it was to make sure I didn’t trip over my dance partner in high-heeled tap shoes.

In the world of live streaming, though, we do dry runs to avoid more technical, but equally embarrassing missteps. Improv can be hilarious, but not when it means you’re verbally unprepared, or your equipment stops working and you don’t have a backup plan.

6) Prep any guest speakers.

Is there anything worse than a moment of awkward, dumbfounded silence?

As part of your dry run, make sure your guests are prepared for any questions they might be asked. Don’t over-rehearse, but do what you can to prevent catching them off-guard.

“It may help to give some questions in advance to a potential guest,” says Hunersen, “but save some follow-up or in depth questions for on-air, so that you're able to let them be both prepared and react in the moment.”

7) Test your audio and internet connection.

You might want people to talk about your live stream, but not if all they’re going to say is, “We can’t hear you.” Make sure all of your audio equipment is working -- both during your dry run and on the day of the stream. Having an extra microphone and batteries on hand probably won’t hurt, either.

Make sure your network can handle a live stream, too. If you’re streaming high quality video, for example, you’ll need both a wire connection and a 3G/4G wireless connection, according to Cleeng.

In other words, make sure your WiFi is working, but also, “grab an ethernet cord,” says Conley. “One thing you can’t help is if your internet connection unexpectedly goes out.”

We know -- even the sound of “ethernet” seems terribly old school. But if your WiFi suddenly drops, you’ll be glad you busted that cord out of storage.

8) Set up social media monitoring.

One great thing about live streaming is your audience’s ability to join the conversation and comment in real time. But try watching any Facebook Live feed, and you’ll see that the comments roll in fast. So while it’s awesome to invite and answer viewer questions  -- especially if you personalize your responses -- it can be overwhelming.

That’s why it’s a great idea to dedicate someone to monitoring social media, comments, and questions during the live feed.

That task can made a bit easier with something like a branded hashtag created specifically for this live stream. For platforms with built-in comment feeds, for example, you can ask your viewers to preface any questions with it -- that can help qualify what needs to be answered.

You could even take that a step further and use the hashtag throughout the planning process, making sure to include it on your landing page, thank-you page, and promotional messages leading up to the event. That helps to create buzz around the live stream. And if you use HubSpot's Social Inbox, here’s a great place to take advantage of its monitoring feature, which lets you prioritize and reply to social messages based on things like keywords or hashtags. 

After Your Live Stream

It’s always nice to follow up with your attendees after your live stream has ended. Thank them for their time, give them a head’s up about your next event, and invite them to download a piece of relevant content. If you’ve followed these steps, you’ve probably done a great job of using your live stream to generate leads -- so keep up the momentum and nurture them

Have you experimented with live streaming? What have you learned? Share your tips in the comments below.

free guide: how to use facebook live


from HubSpot Marketing Blog http://blog.hubspot.com/marketing/how-to-live-stream-checklist
Via http://blog.hubspot.com/marketing/how-to-live-stream-checklist

Email Marketing for Schools [New Ebook]

EmailMarketingForSchools_HeaderImage.jpg

Choosing a school is a big decision that's grounded in education and research. 

Controlling this discovery process that drives someone to select your school is no easy task. There's a wealth of information available on the internet, not to mention the mass of communications that prospective students and parents receive daily.

Email has been a game-changer in the admissions process, helping schools to further inform prospects by placing helpful information right in front of their eyes. That said, the amount of email being sent is on the rise, and it takes some serious skill to really wow readers nowadays. 

So, how do you create an effective email marketing plan that boosts enrollment for your school?

We're excited to share a new complimentary ebook, Email Marketing For Schools, designed to help you exceed your admissions and enrollment goals. In it we'll share:

  • How to grow your email list (the right way)
  • Tips for segmenting your database of prospective students and parents
  • A breakdown of which emails you should send throughout the enrollment journey
  • Email design and copy best-practices
  • An interactive checklist to ensure each and every send is your best one yet
  • Examples of emails we love from both independent and higher education schools
  • And more!

You can download your copy of Email Marketing for Schools here >> 

Like what you read? Let us know in the comments or feel free to share on Twitter

Email MArketing For Schools


from HubSpot Marketing Blog http://blog.hubspot.com/marketing/email-marketing-for-schools-new-ebook
Via http://blog.hubspot.com/marketing/email-marketing-for-schools-new-ebook

How to Get Caught Up on Email After Vacation: 9 Helpful Tips

post-vacation-inbox.jpg

There's nothing that squashes vacation bliss quite like coming home to a crazy inbox.

One minute, you're reminiscing about the stunning sunset you caught on your last night. The next, you're scrolling through an overwhelming number of unread emails, desperately trying to discern which ones you actually need to read and wondering why on earth you thought it was okay to take vacation in the first place.

But taking quality time away from the office -- and away from work email -- is actually good for you. It's good for your physical health, your mental health, and your productivity and creativity when you actually get back to work.

In fact, a study from the University of California, Irvine found that the very act of checking email increases our heart rate and stress level -- and that spending just five days email-free makes us objectively calmer.

The key to recovering a healthy inbox quickly comes down to planning your time and organizing smartly. Read on for nine tips for cleaning up your inbox after vacation.

How to Get Caught Up on Email After Vacation: 9 Helpful Tips

1) Set up a filtering system before you even leave.

While most of the tips on this list are about how to deal with your email after vacation, there are things you can do to set yourself up for success before you leave that can make a big difference. My favorite? HubSpot's Director of Marketing Rebecca Corliss' awesome email filtering system on Gmail that she sets up before every vacation, which you can read about in detail here.

Here's the short version: Before she leaves for vacation, Corliss creates a whole bunch of filters that sort her incoming emails into specific folders as they come in. For example, one filter puts all of the emails sent by her immediate team members into a single folder so she can find and read those first. She also has filters that delete automated emails she doesn't need to read, like daily traffic and leads dashboards.

The result? She's effectively ensured that when she gets back from vacation, her immediate inbox will be at or near zero.

2) Set expectations with an out-of-office auto-reply message.

If you don't already set up out-of-office auto-replies when you go on vacation, you should start now. Whenever someone sends you an email when you're out of town, they'll receive an automated email you've written that lets them know you're out of the office and won't be checking email until a certain date.

Your message could be as simple as:

Hey there,

Sorry I missed your email. I'm currently [traveling/celebrating my friend's wedding/hiking in the Alps] and won't be checking email until [date]. If it's urgent, please reach out to [name] at [email]. Until then, why not check out [link to piece of interesting company content]?

Thank you!

If you want to really set expectations for the people while also making your life easier when you return, then I recommend adding a short paragraph similar to the one below, which I borrowed from my colleague Sam Mallikarjunan:

If you want to make sure your message gets a response ASAP when I return, please send it again on [date]. I recommend using this free email scheduling tool to schedule it now, while you're thinking about it.

Not only does this help set expectations, but it'll mean the most important emails will be at the top of your inbox when you get back.

If you're looking for different wording, here are a few other auto-reply templates to try.

Pro Tip: Leave your auto-reply message on for an extra day while you're catching up on email. It'll help prevent an influx of requests the day you get back, while also keeping people's expectations of a response to a minimum while you're working through everything.

3) Block 2–3 hours for going through your inbox on your first morning back.

This is something you should book on your calendar before you leave for vacation. Go into your online calendar and block off at least two or three hours on the morning of the first day you're back at work. Since mornings tend to lend fewer distractions, it'll be easier for you to crank through your emails without multitasking, which can really hurt your productivity. (See #4 for more on how to stay distraction-free.)

I usually name that block of time something like "Hold for catch-up" so people know not to book me. 

4) Use the Pomodoro technique to get through emails faster.

When it finally comes time to clean your inbox post-vacation, the best way to stay productive is to hone in on those emails -- and only those emails. But you have to be realistic about how long you can concentrate at any given time before you start getting distracted. That's where a time management technique like the Pomodoro technique can come in handy.

The Pomodoro technique is one of my favorite time management techniques. It's based on periods of distraction-free work followed by short breaks. To easily monitor time, I recommend using desktop timers like Pomodoro One for Mac or Tomighty for Windows. To use the technique, it's as easy as pressing "start" and "stop."

Pro Tip: To get the most out of your distraction-free work, turn your cell phone on silent and remove email and social media notifications and other distractions from your computer and work atmosphere.

5) Organize your emails into folders.

Creating folders (or labels, if you use Gmail) within your inbox can help you categorize the various types of emails you receive on a daily basis so that you can more easily sort and see who is emailing you and what it is about. Having a place to put archived emails will make you much more likely to actually archive them, and having a system in place will help you get through an overwhelming inbox a lot quicker.

If you use Gmail, I highly recommend Andrea's Klinger's "inbox zero" methodology, which I live by when it comes to maintaining a healthy inbox. The methodology uses two built-in features in Gmail: "special stars" (a slightly fancier labeling system than Gmail labels) and multiple inboxes.

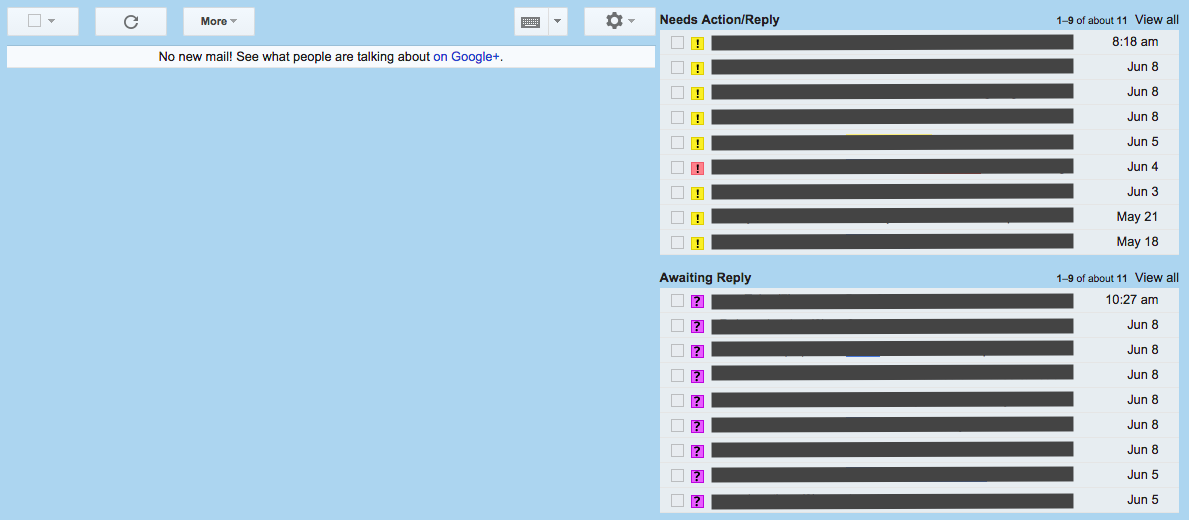
Here's what your inbox will look like once you get through them all:

inbox-zero-1.png

Don't be intimidated by the unfamiliar set-up -- it's actually quite easy to do. Since publishing this step-by-step guide to his methodology last year, many people have told me it's changed the way they use email -- and has made their lives a lot easier.

If you don't use Gmail or you'd rather stick to a more classic labeling system, take the time to actually think about the emails you receive and how you might sort and categorize them efficiently. Focus on creating folders based around the various roles you take on at your job, the automated emails you receive, and the people you work with. For example, you might have a folder dedicated to all the email exchanges you have with your direct reports.

6) Delete and archive ruthlessly.

Some people hoard household items -- clothing you haven't worn in years, for instance. You know you probably aren't going to wear it, but you keep it anyway on the off-chance someone throws an '80s-themed party.

It's the same way with emails. A lot of people have a strange attachment to emails solely because they're afraid to "let them go" -- i.e., move them to a folder, archive them, or (gasp!) delete them. (That's why it pays to have some sort of system for organizing your emails. See #5.)

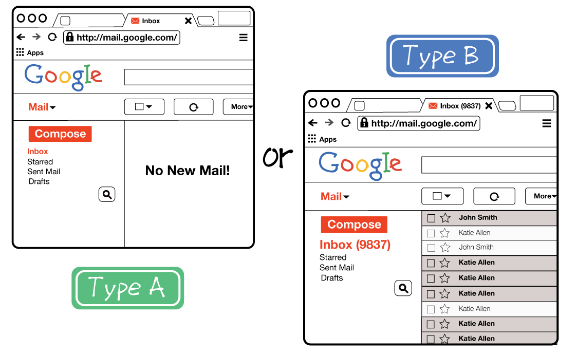
clear-inbox.png

But when you get back from vacation, you're probably facing hundreds, maybe thousands of new emails in your inbox. The hardest part is figuring out which ones of those are actually important, and which ones you really don't need to respond to -- and can either archive or delete. Ruthlessly. Trust me, once you get started, it'll actually feel good.

Pro Tip: If you have a little more time, you may want to unsubscribe as you delete automated emails. After all, the easiest way to have a cleaner inbox after time away is simply ... to get less email in the first place. Use a free tool like Unroll.Me to mass unsubscribe from every single newsletter that doesn't provide you with value on a regular basis. (In fact, my recommendation is to unsubscribe from everything. Take a few days to let it sink in, and then re-subscribe only to the newsletters you really, truly miss.)

7) Don't try to respond to everything.

As tempting as it might be to be the most selfless, helpful, and perfect version of yourself 100% of the time, it's important for your inbox (not to mention your sanity) to think of email messages not as precious, but as perishable, as Merlin Mann once put it. As "[p]erishable, time-stamped milk that becomes a little less fresh every day until it smells kind of funny and just needs to be dumped."

There's simply no way you'll be able to respond to every single email that arrives in your inbox -- let alone even read them all. This is especially true when you come back from a vacation and are dealing with hundreds of unread emails.

So archive emails. Delete them. Whatever you do, don't respond to every single one.

8) Reply faster using canned emails and templates.

For some of the emails that do require a response, you might be able to make the process of responding more efficient. For example, do you ever find yourself typing out very similar email responses to different people over and over again? This happens to me a lot -- like when people ask me how to submit a guest post to the Marketing Blog. I used to manually type out my responses to these emails, which required finding and copying the link to our guest blogging guidelines page, crafting a few sentences, and so on.

Then, I discovered "canned responses," a features in Gmail, Outlook, and several other email clients, which has probably saved me hours of time copying-and-pasting over the course of a few years. Here's how to set that up in Gmail and Outlook.

To Set Up Canned Responses in Gmail:

  1. Click the gear icon in the upper right-hand corner and choose "Settings."
  2. Click the "Labs" tab, find Canned Responses at the top, and click "Enable." Scroll down and click "Save Changes."

To create a canned response, compose a new email and click the little arrow in the bottom right-hand corner of the new email. Choose "Canned responses," and then "New canned response." From there, you can name your new canned response, write it, and save it. Anytime you want to use it, simply go back to that little arrow, choose "Canned responses," and click on the one you'd like to use. (Learn more on Google's website.)

To Set Up Canned Responses in Outlook:

In Outlook, the best option I could find was to set up your canned responses as "Signatures." That way, when you reply to an email, you can choose the appropriate "signature" and the whole canned reply will appear. Here's how to do that:

  1. On the Outlook menu, click "Preferences." Under "E-mail," click "Signatures."
  2. Click the plus icon to add a new signature.
  3. A new signature will appear under "Signature name" with the label "Untitled." Double-click "Untitled," and then type in a new name for your canned response.
  4. In the right pane, type the text that you want to include in the signature -- in other words, type in your canned response.

Once you create the canned response as a signature, you can add it to a new email by clicking in the message body, choosing the "Message" tab, clicking "Signatures," and choosing a signature from the list. (Learn more on Outlook's support page.)

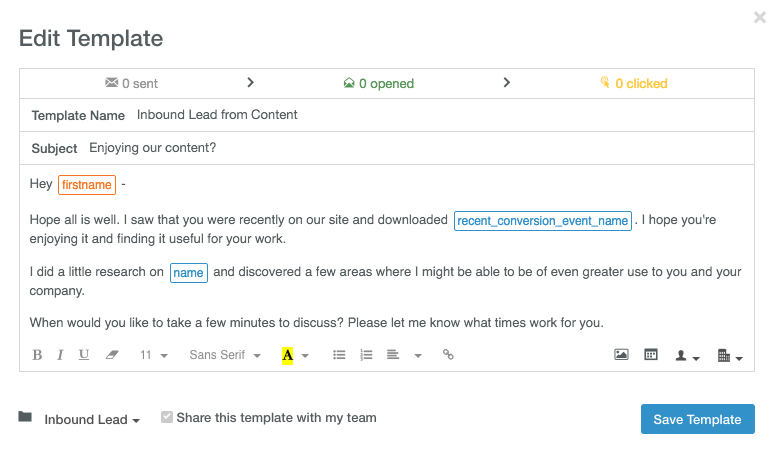
Or, if you use HubSpot CRM, you can use the built-in email templates to easily send personalized emails right from your email tool.

hubspot-email-templates.png

9) Use Boomerang to resurface emails when you need them.

As for those emails that will need a response eventually, but just not right now ... When you're dealing with a full inbox, it can be easy to forget about them entirely. (Or, worse, accidentally get rid of them.) That's where a free tool like Boomerang for Gmail can be really, really helpful.

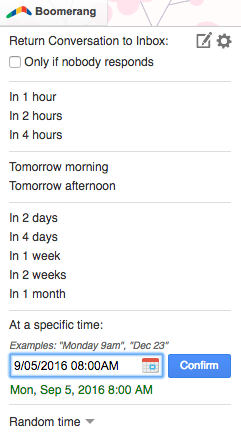
Boomerang lets you archive an email, but choose the exact date and time you want it to re-emerge in your inbox -- as an unread message. In other words, it removes messages from your inbox until you actually need them. All you have to do is click the "Boomerang" button when you have an email open and choose when you need it again. It'll archive your email until the time you choose.

boomerang-gmail.png

(Read this blog post for a list of 14 email organization tools including Boomerang that'll help you keep a clean inbox.)

Remember: A full inbox is inevitable after you take some time off. You don't have to let it overwhelm you; you just have plan for it. Set up that out-of-office auto-reply message, create filters to organize your incoming messages more clearly, and block off time on your first day back to clean your inbox. When it comes time to dig in to all those unread emails, trust your instincts and be ruthless about archiving and deleting.

Until then, relax and enjoy that well-deserved vacation. 

How do you recover from your post-vacation inbox? Share your tips with us in the comments.

free email productivity tips


from HubSpot Marketing Blog http://blog.hubspot.com/marketing/email-inbox-vacation-tips
Via http://blog.hubspot.com/marketing/email-inbox-vacation-tips