When people talk about today's most popular social sharing websites, YouTube often gets left out of the conversation in favor of sites like Facebook and Twitter.
But don't be fooled: YouTube has a lot going for it. Although Facebook might be the largest social networking site, YouTube has the second greatest reach after Facebook in terms of general usage. It's also the second biggest search engine behind its parent company, Google.
And there are a ton of cool things you can do with YouTube that you might not know about, whether you use YouTube to watch videos, post them, or both. For example, did you know that YouTube automatically creates a written transcript for your videos -- and that polishing them can help you get your videos found more easily in search? Or that you can use YouTube to easily create a photo slideshow, and even set it to music using their royalty-free audio library?
Mind-blowing stuff, people. To help you make the most out of the still very popular platform, we've put together a list of 17 of the lesser-known hacks, tips, and features YouTube has to offer.
17 Hidden YouTube Features, Tips & Hacks You'll Want to Know About
1) You can create a link that starts a YouTube video at a certain time.
Ever wanted to send someone a YouTube video, but point them to a specific moment? Let's say, for example, that you're trying to recruit your friends to learn the dance in LMFAO's "Party Rock Anthem" music video with you.
Instead of sending your friends the general YouTube link and instructing them to fast-forward to the 3:39 minute mark, you can actually send them a specific link that starts the video at whatever time you choose. Click here to see what I mean. I'll wait.
Back? Alright, here's how to do it.
To create a link that starts a YouTube video at a certain time: Open up the video and click "Share" underneath the video title. Then, under the first tab (also labeled "Share"), check the box next to "Start at:" and type in the time (in hours:minutes:seconds) you want. Alternatively, you can pause the video at the time you want it to start and that field will autofill.
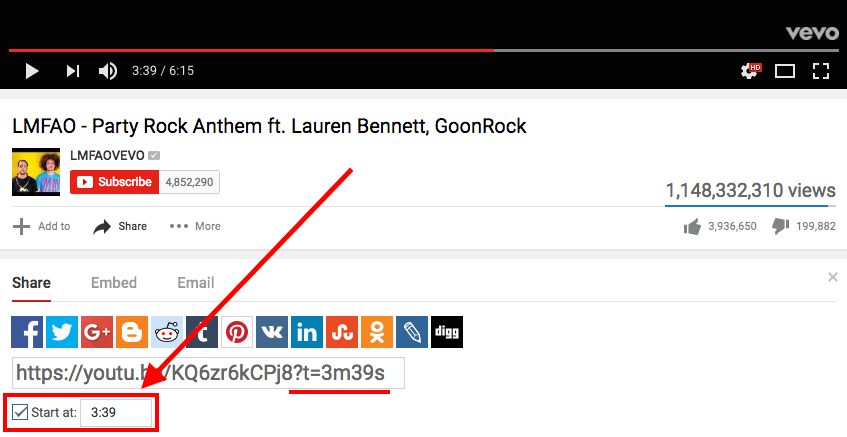
After a few moments, you'll see a tag add itself to the end of the generic YouTube link (in this case, ?t=3m39s). Simply copy that link and paste it wherever you'd like.
Alas, you can't embed a video so it starts at a certain time; you can't only link to it.
2) You can easily see the written transcripts of people's videos.
Did you know that YouTube automatically generates a written transcript for every single video uploaded to its website? That's right -- and anyone has access to that transcript, unless the user manually hides it from viewers.
I can think of a number of different situations where video transcripts can come in handy. For example, maybe you want to write down a quote from a video, but the tedium of pausing-and-typing, pausing-and-typing would drive you up a wall. Or perhaps you need to find a specific section of a video, but don't want to rewatch the whole thing to find it. With a transcript in hand, you can find information like this without doing it all by hand.
To see a video's transcript: Open the video in YouTube and press the "More" tab underneath the video title. Choose "Transcript" from the dropdown menu.
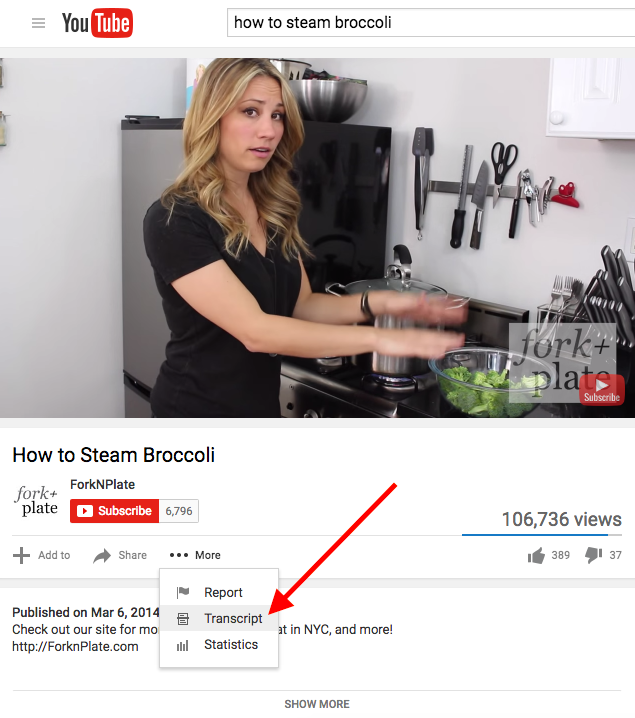
(If you aren't seeing this option, it's because the user chose to hide the transcript.)
The transcript will appear as a new module in the same window. In many cases, the user who uploaded the video will not have gone back and manually polished the transcript, so it won't be perfect. But it'll certainly save you some time and pain.
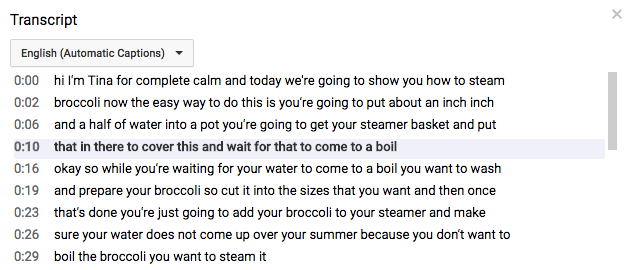
3) You can help your video get found in search by editing or uploading a transcript.
Both YouTube and its parent company Google look at a number of factors when ranking videos in search to determine what your video is about, and your transcript is one of them. (An even bigger ranking factor is your video's description, which is why Digital Marketing Consultant Ryan Stewart suggests that you actually paste your transcript right into the description box, too.)
To add a transcript to your video: Open the video on YouTube, and you'll see a row of icons just below the play button. Click the icon on the far right for "Subtitles & CC." (CC stands for "Closed Captions.)

Set your language if you haven't already. Then, you'll then be prompted to choose among three different ways to add subtitles or closed captions to your video by ...
- Uploading a pre-written text transcript or a timed subtitles file. (Learn more about the file types you can upload and more here.)
- Pasting in a full transcript of the video, wherein subtitle timings will be set automatically.
- Typing them in as you watch the video.
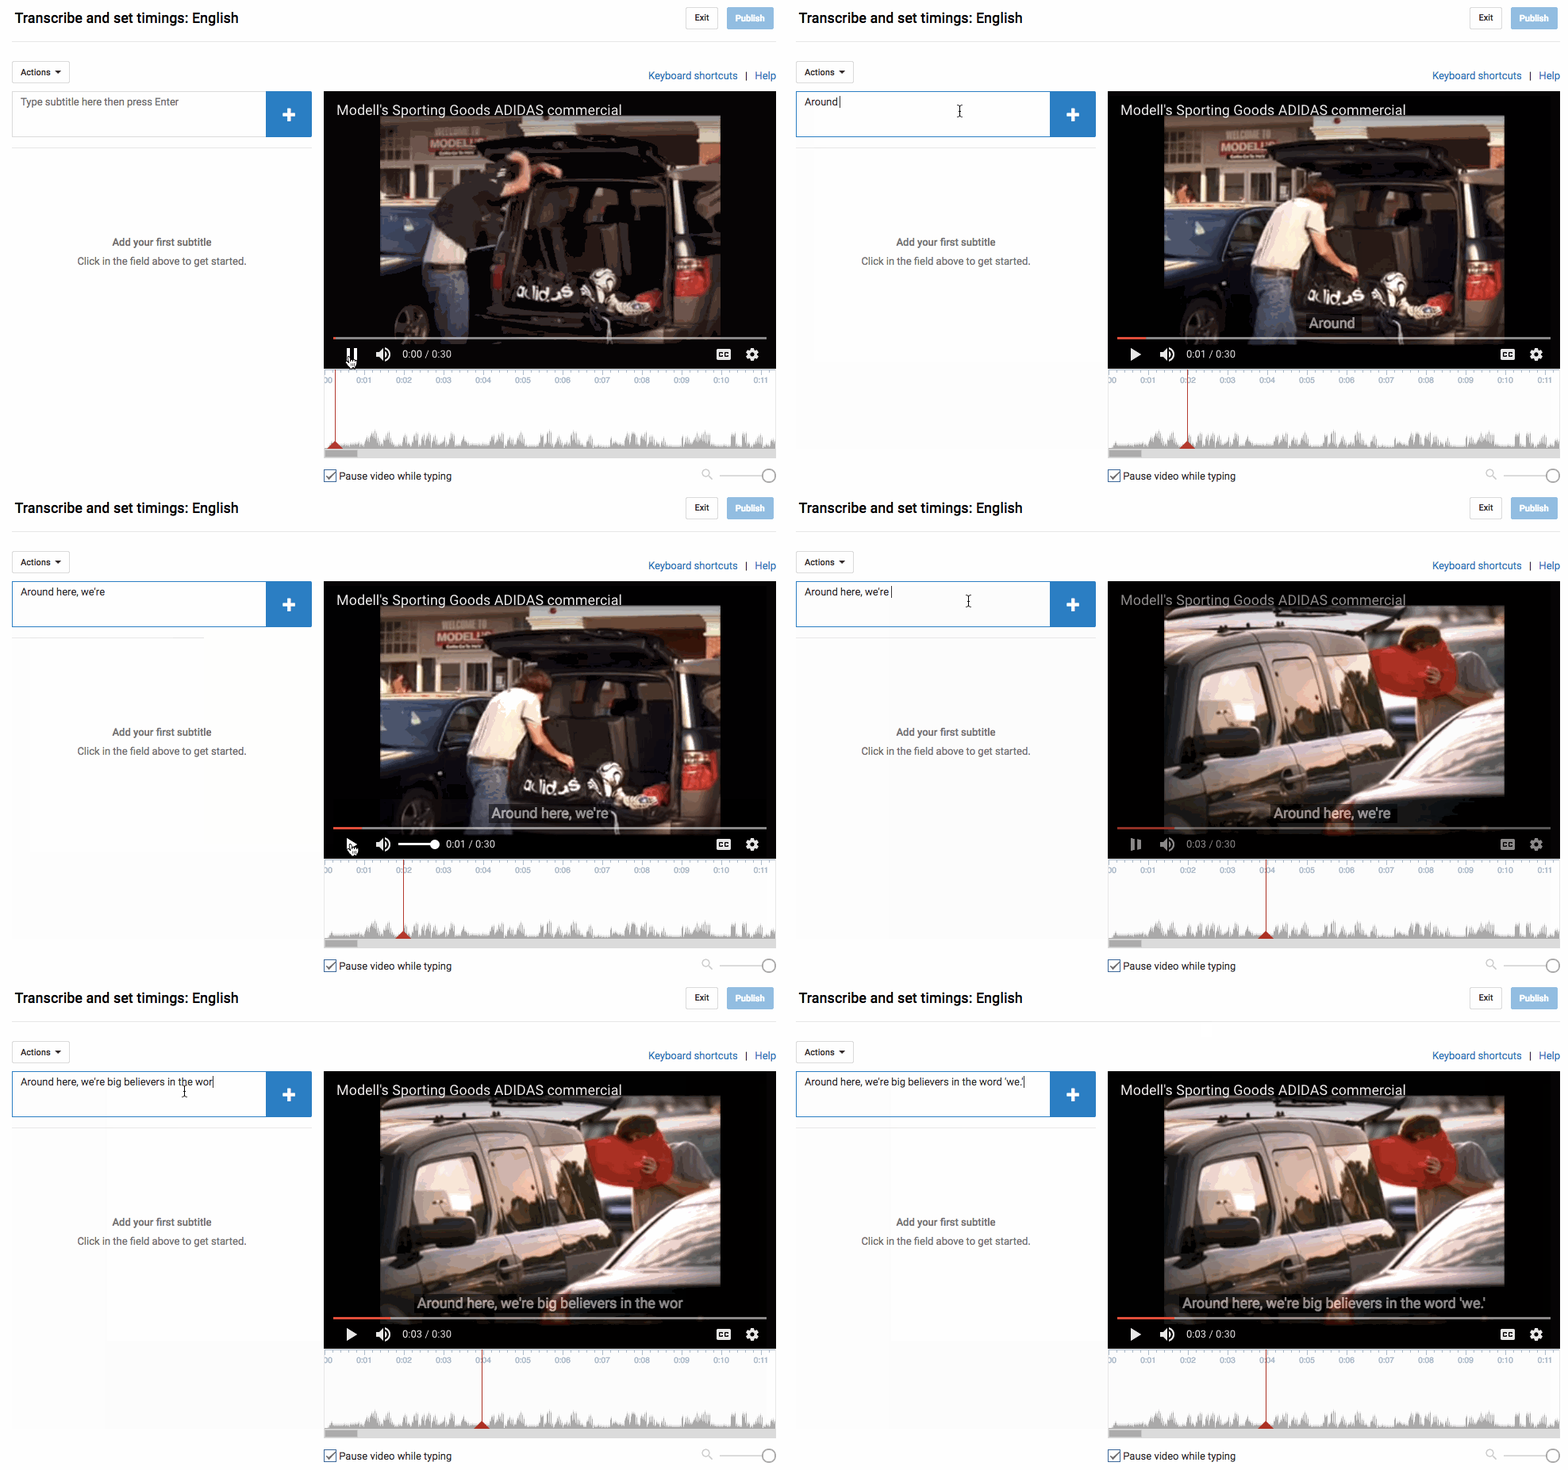
The folks at YouTube have done some great things to make that third option (typing as you watch) as painless as possible. For example, if you check a box next to "Pause video while typing," it'll make the whole process a lot faster. Here's a GIF showing that in action:
4) You can use YouTube to easily get free transcriptions of your videos and audio files.
This is the last one about transcripts, I promise -- but I'll bet you never thought about them this way. As you know from #2, YouTube automatically adds a transcript to every video. But if you're looking for a one-off transcription of an audio or video file and don't want to pay for a service, YouTube's built-in captioning system isn't a bad place to start. You can always clean it up later.
To get an automated transcription for a video: Simply upload your video to YouTube, open it on YouTube's website, press the "More" tab underneath the video title, and choose "Transcript" from the dropdown menu. The transcript will appear as a new module in the same window. If you want to clean it up, follow the steps outlined in #3 for a user-friendly experience.
To get an automated transcription for an audio file: You'll need to upload your audio recording to YouTube using a service like TunesToTube. It'll take anywhere between 2–30 minutes for YouTube to upload it. Then, follow the instructions for getting an automated transcription for a video, outlined above.
5) You can create, share, and collaborate on video playlists.
Just like on your other favorite media sharing sites like Spotify and iTunes, you can create a "playlist" on YouTube -- which is really just a place to store and organize the videos (your own and others'). You can keep playlists private, make them public, or even share them directly with others.
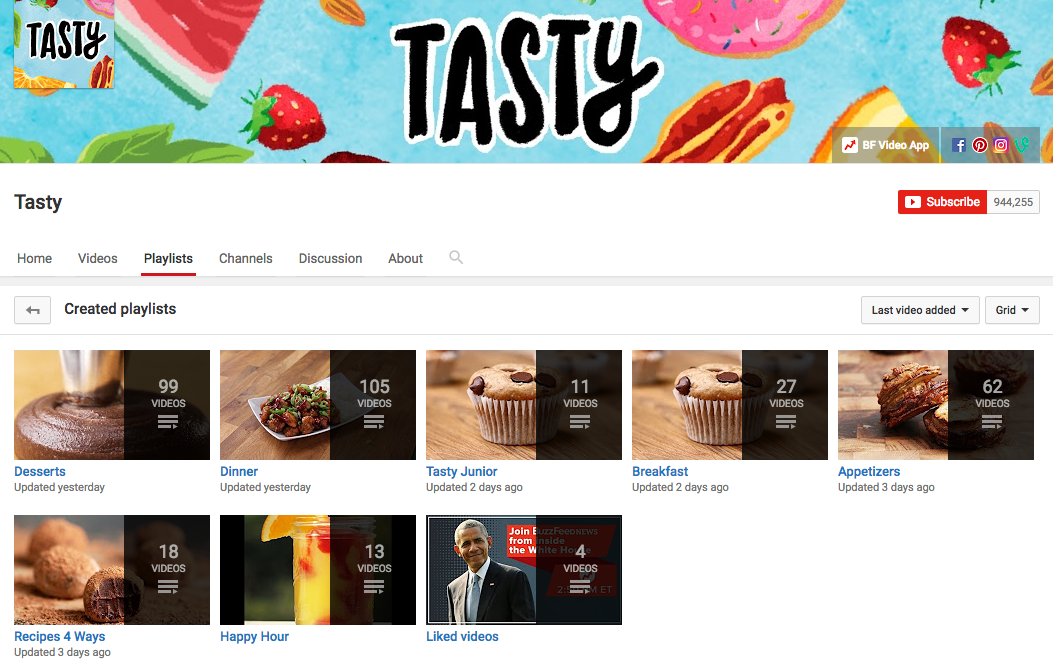
Playlists are useful for a variety of different types of users, from an individual collecting cooking videos for their upcoming dinner party to a brand segmenting their YouTube video content by topic. For example, Tasty's YouTube playlists break up recipes by meal type, making it easier for people to browse and find what they're looking for:
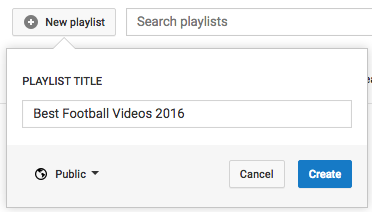
To create a playlist on desktop: Go to your Playlists page by clicking here or clicking your account icon in the top right, choosing "Creator Studio," clicking "Video Manager" on the left, and choosing "Playlists." Then, click "New Playlist" on the top right and choose whether you'd like to keep it private or make it public.
To create a playlist on mobile: Click here for instructions explaining how to create new playlists using your iOS or Android mobile devices.
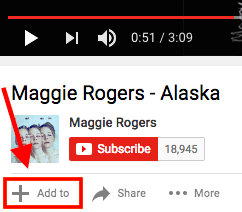
To add a video to a playlist: If you're adding a video to a playlist while you're watching it, click the "Add to" icon below the video title and check the box next to the playlist you'd like to add it to.
If you want to add a video to a playlist right from your Playlists page, simply click "Add Video" and either paste in a video URL, choose a video from your uploads, or search for a video on YouTube. Once you find the video you want to add, select the "Add to" menu from that video and add it to the playlist.
Your friends can contribute to your playlists, too. All you have to do is turn on the ability to collaborate on playlists. Once you turn it on, anyone you share a playlist link with can add videos to that playlist. (They can also remove any videos they've added, too.)
To add friends to a playlist: Go to your Playlists page again and open the playlist you want to collaborate on. Click "Playlist Settings" and choose the "Collaborate" tag. Toggle on that collaborators can add videos to the playlist, and from there, you can send them a link where they can add videos to the playlist.
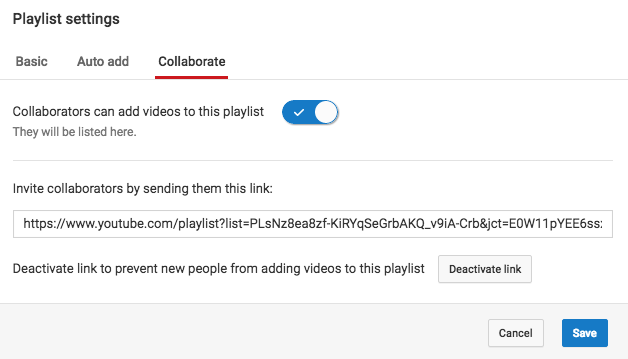
Once your friend's been invited to a playlist, they'll be able to add new videos to it and remove videos they've added in the past. They just have to follow some on-screen instructions first to confirm they want to be a contributor and to save the playlist to their own account.
When you add a video to a playlist you're collaborating on, your name will appear next to the video in the playlist, and everyone who's been invited to collaborate on that playlist will get a notification that a new video has been added.
(To learn more about how to manage contributors, stop accepting contributions to a playlist, and so on, read this YouTube Support page.)
6) You can save videos to watch later.
Ever seen YouTube videos you wished you could bookmark for later? Maybe you aren't able to turn the sound on at the moment, or perhaps you just don't have time to watch it. Well, YouTube took a page out of Facebook's ... book ... by adding something very similar to Facebook's "Save for Later" feature (#2 in this blog post). On YouTube, you can save videos to a "Watch Later" playlist to access whenever you want.
The "Watch Later" playlist operates just like a normal playlist, so the instructions are identical to the previous step (except you can't invite others to collaborate on your "Watch Later" playlist).
To add a video to your "Watch Later" playlist: Open the video on YouTube and click the "Add to" icon below the video title and check the box next to the playlist you'd like to add it to, just like you did in the previous step. The steps are very similar on mobile, but click here if you want the full instructions from YouTube's Support page.
To access those videos: Simply go to your YouTube homepage and choose "Watch Later" from the menu on the left-hand side of your screen.
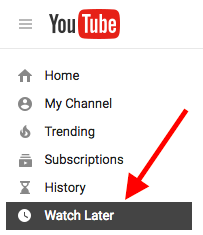
From there, you can watch the videos you were saving, as well as easily remove videos from that list that you've already watched.
7) You can create your own custom YouTube URL.
Want to give people an easy-to-remember web address to get to your YouTube channel? You can actually create a custom URL, which you can base on things like your display name, your YouTube username, any current vanity URLs that you have, or the name of your linked website. HubSpot's, for example, is https://www.youtube.com/hubspot.
Important Note: Before you do this, make sure you're positive this is the custom URL you want -- because once it's approved, you can't request to change it, nor can you transfer it to someone else. Keep in mind that it'll be linked to both your YouTube channel and your Google+ identity, too.
Unfortunately, not everyone's eligible for a custom URL. To get one, you have to have 100 or more subscribers, be at least 30 days old, have an uploaded photo as channel icon, and have uploaded channel art. If that sounds like you, keep readin'.
To claim your custom URL: Open up your YouTube account settings and click "Advanced" in your name section.
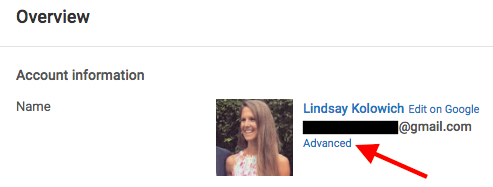
If you're eligible for a custom URL, you'll be prompted to claim yours by clicking a link.
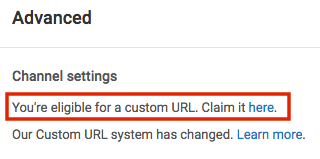
Select the box next to "I agree to the Terms of Service." Then, once you're super sure it's the URL you want since you can't ever change it, click "Change URL" to make it final.
8) You can add clickable links to your videos.
Want people to not only watch your video, but engage with it, too? On YouTube, you can add clickable links YouTube calls "annotations" to your videos. These annotations work kind of like call-to-action buttons, and you can use them to link people to subscribe to your channel, to link to merchandise or a fundraising campaign, to go to another resource to learn more, and so on.
It's an easy way to encourage people to actually engage and interact with your videos. (For marketers, it might even be a way to send people back to your website.)
What do these clickable links look like? To see one in action, check out the video below. You'll see it pop up at the 10-second mark -- and if you click on it, you'll see it pauses the video and opens up a new tab in your browser for you to explore.
Pretty cool, huh? Here's how you add annotations like that to your own videos.
To add a clickable link/annotation to a video: First, make sure your YouTube account is verified and that you have external linking turned on for your account.
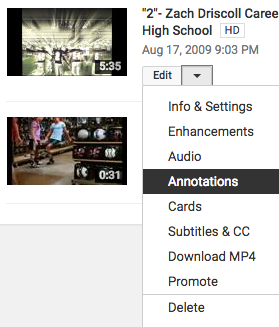
Once you've got that set up, open up YouTube and go to your Video Manager by clicking here or clicking "Video Manager" near the top of your YouTube home page. Then, find the video you want to add links to and click the arrow next to "Edit." Choose "Annotations" from the drop-down menu.
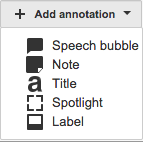
Click "Add Annotation" to add a new annotation, and choose from the five annotation types in the pull-down menu: Speech bubble, Note, Title, Spotlight, or Label. For this tutorial, we chose the note option. (Read this blog post to see what each of these annotations look like.)
Once you choose an annotation type, you can then add text, choose your font, size, background color, and transparency. Below the video, you can choose exact start time you want your annotations to start and end.
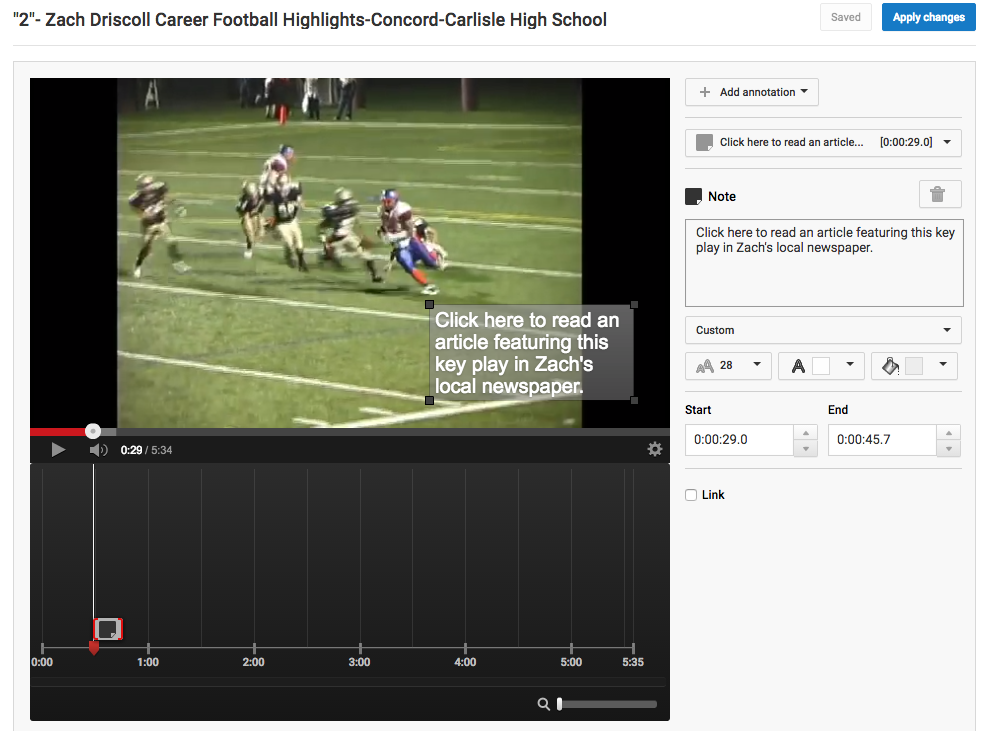
Here's the key part: To add a link, tick the checkbox next to "Link" and choose what type of page you'll link to, like an "Associated Website." (Pro Tip: Use tracking tokens on the URL to track how many people actually click it.)
When you're done, click "Publish" -- and you're all set. You can always edit your annotations after publishing by going back into the "Edit Annotation" tool and click "Edit existing annotation."
You can read this blog post for more thorough instructions on adding annotations to videos.
Note: Annotations appear on standard YouTube players and embedded players, but they don't appear on YouTube chromeless players, or on mobile, tablet, and TV devices.
9) YouTube has a big library of high-quality, royalty-free sound effects and music you can browse and download.
Want to add some cool sound effects or music to your YouTube video (or any video)? YouTube is there for ya. They have a whole library of high-quality, 320kbps audio tracks and sound effects that you can download royalty-free and add to your videos. (Or listen to in your free time. We won't judge.)
To add music or sound effects to your video: Open YouTube's Audio Library by clicking here or opening your Creator Studio, clicking "Create" in the menu on the left-hand side, and choosing "Audio Library."
Now, the fun begins. By default, it'll start you on the "Sound effects" tab. Here, you can search sounds using the search bar, like I did in the screenshot below for motorcycle sounds.
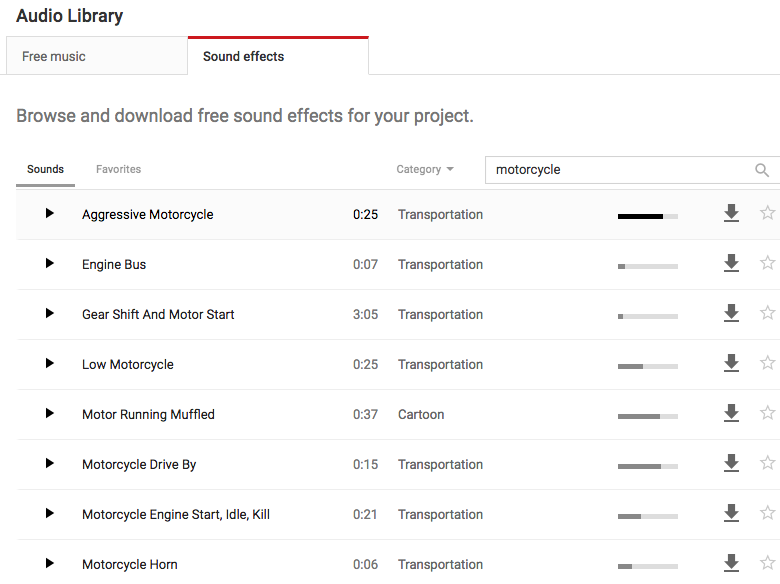
You can also toggle by category (everything from human voices to weather sounds) or scroll through favorites that you've starred in the past. For easy access in the future, select the star to add the track to your Favorites. The bars next to the songs show how popular a track is.
If you switch over to the "Music" bar, you can browse through all their royalty-free music. You won't find the Beatles in here, but you will find some good stuff -- like suspenseful music, uplifting music, holiday music, jazz, and more. Instead of toggling by category, you can toggle by genre, mood, instrument, duration, and so on.
(Note: Some of the music files in there may have additional attribution requirements you have to follow, but those are pretty clearly laid out on a song-by-song-basis. You can learn more on YouTube's Support page here.)
Once you've found a track you like, click the arrow to download it and it'll download directly to your computer as an MP3 file. Then, you can do whatever you want with it.
If you want to source sounds for your videos outside of YouTube, you'll just have to make sure to you're following all the rules for sourcing them. Refer to this YouTube Support page for best practices for sourcing audio, and this one to learn YouTube's music policies.
10) You can easily create photo slideshows and set them to music.
Ever wanted to make one of those cheesy photo slideshows for a birthday or a baby shower or a team party? There's no need to download software or use an unfamiliar platform -- YouTube has a special featured designed just for creating photo slideshows. And it's really easy to use.
You can upload as many photos and videos as you'd like, and choose from hundreds of movie styles, transitions, and effects to make it look awesome.
Plus, remember YouTube's Audio Library we just talked about in #9? You can totally source music or sound effects from that and add it to these videos without a hassle.
Here's how you do it. (Pro Tip: I'd recommend gathering all the photos you want into a single folder on your computer before you start making the slideshow to save time selecting them.)
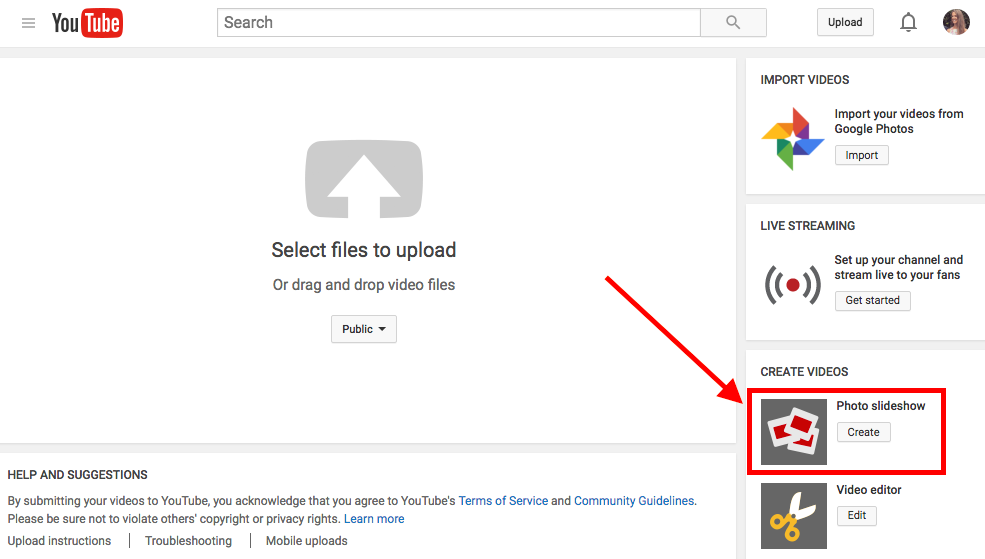
To create a photo slideshow: Log in to YouTube and click the "Upload" button at the top right of your screen. Normally, this is where you'd upload a pre-existing video -- but instead, you'll want to find the "Create Videos" module on the right-hand side of your screen. Find "Photo slideshow" in that module and click "Create".
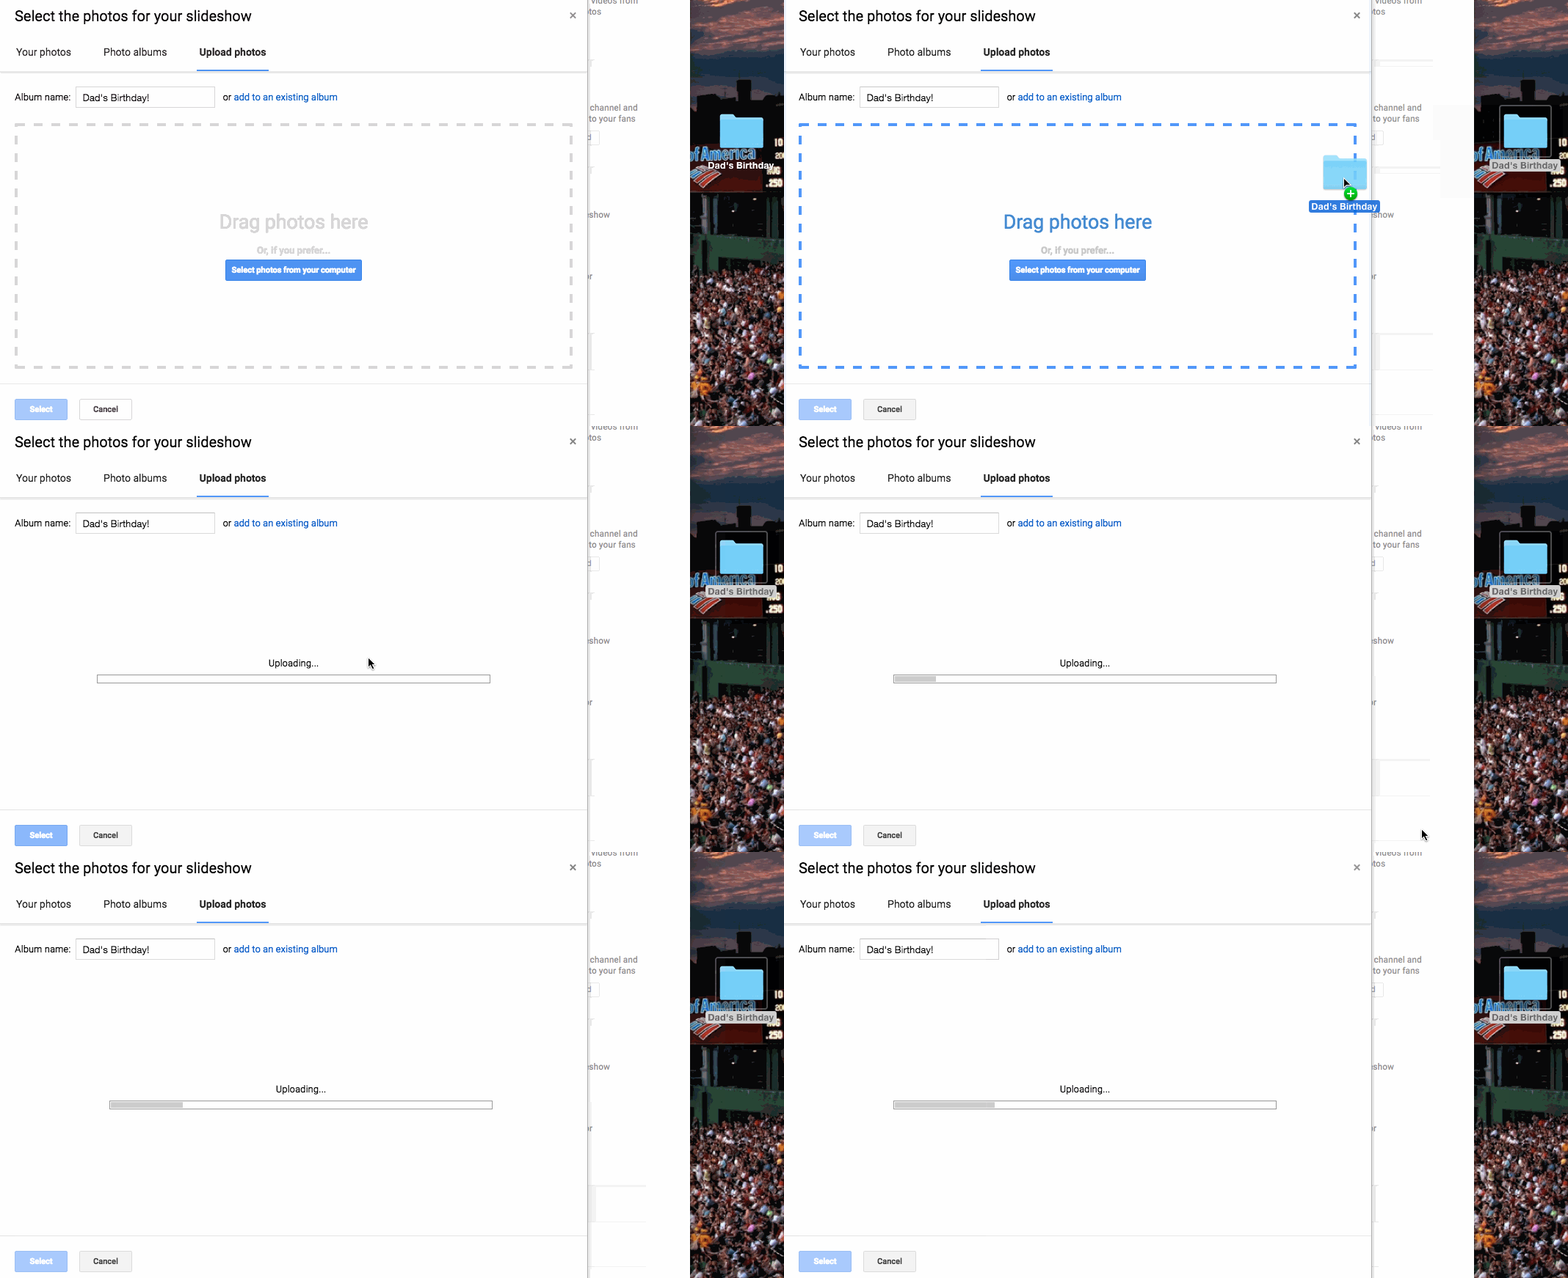
At this point, you'll be able to choose your photos -- either ones you've already uploaded to Google+, or photos on your computer. If you followed my advice above and created a folder for the photos you want, then choose the tab "Upload Photos" and add the folder either by searching for it manually, or by dragging-and-dropping like I did below.
From there, you'll be able to rearrange the photos and add more photos if you'd like.
Press "Next" on the bottom right, and it'll open up the video preview, where YouTube has created the transitions for you based on what's most popular. The default option actually looks pretty good -- but you can always change the slide duration, the slide effect, and the transition. You can still press "Back" if you decide you want to rearrange the photos or add more.
On the right, you'll see a list of suggested the top ad-free songs from the audio library. Pick from this list, search the library for different ones, or check the box next to "No Audio" to keep it silent.
When you're all set, click "Upload" on the bottom right and wait for the video to process. This could take a few minutes. While you're waiting, you can fill out the description, add tags, choose to make it public or private, add it to a playlist, and so on.
Here's the end result of mine, which took me a total of maybe three minutes after choosing the photos:
11) You can live stream videos to YouTube.
Live streaming video has been a big topic of conversation for the past few years. It's seen massive growth, especially in the past few years with the advent of Twitter's Periscope and the recent Facebook Live phenomenon.
YouTube's been ahead of the curve, offering a live streaming option on desktop for the last few years -- but in June 2016, they finally added the ability for people to live stream from their mobile devices, directly from within the app. Unfortunately, the live mobile video streaming is only open to a select few right now, and all we know about timing is that they'll start opening it to more users "soon."
Live streaming on YouTube is a little more complex (and confusing) than than live streaming using Facebook Live, though. On YouTube's easier streaming option, there's no simple "start" button; instead, you actually have to download encoding software and set it up to use live streaming at all. Luckily, YouTube has easy-to-follow instructions for how to do just that.
If you're streaming a live event, though, all you need is a webcam. We'll get to that in a second.
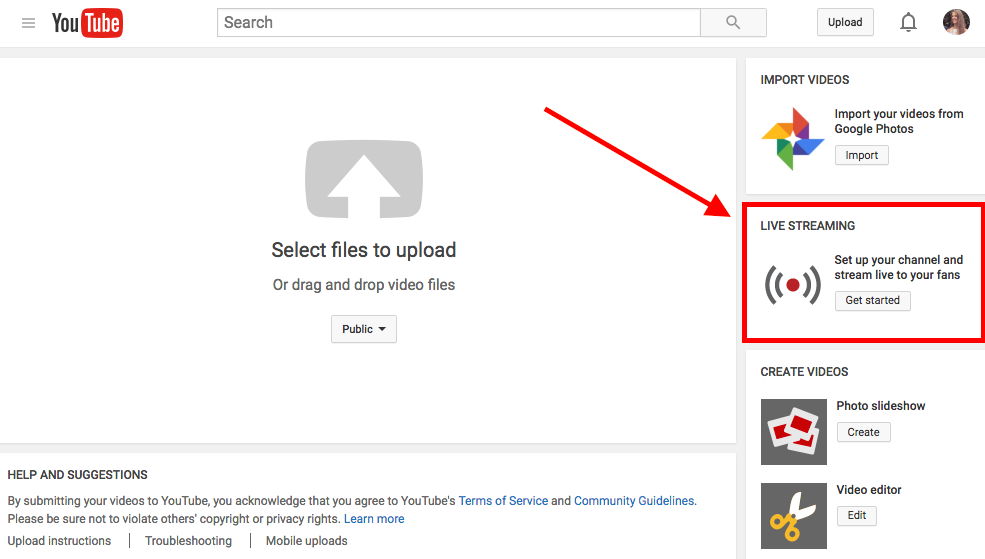
To live stream from your desktop computer: Log in to YouTube and click the "Upload" button at the top right of your screen. Normally, this is where you'd upload a pre-existing video -- but instead, you'll want to find the "Live Streaming" module on the right-hand side of your screen. Click "Get Started" in that module.
Before you go live, YouTube will first confirm that your channel is verified and that you have no live stream restrictions in the last 90 days. Once that's all set, you have two options for streaming: "Stream now" and "Live Events."
Stream Now
Stream Now is the simpler, quicker option for live streaming, which is why it's YouTube's default for live streaming. You'll see a fancy dashboard like the one below. (Note that live streaming is still in beta as of this posting, so your dashboard may look different from mine.)
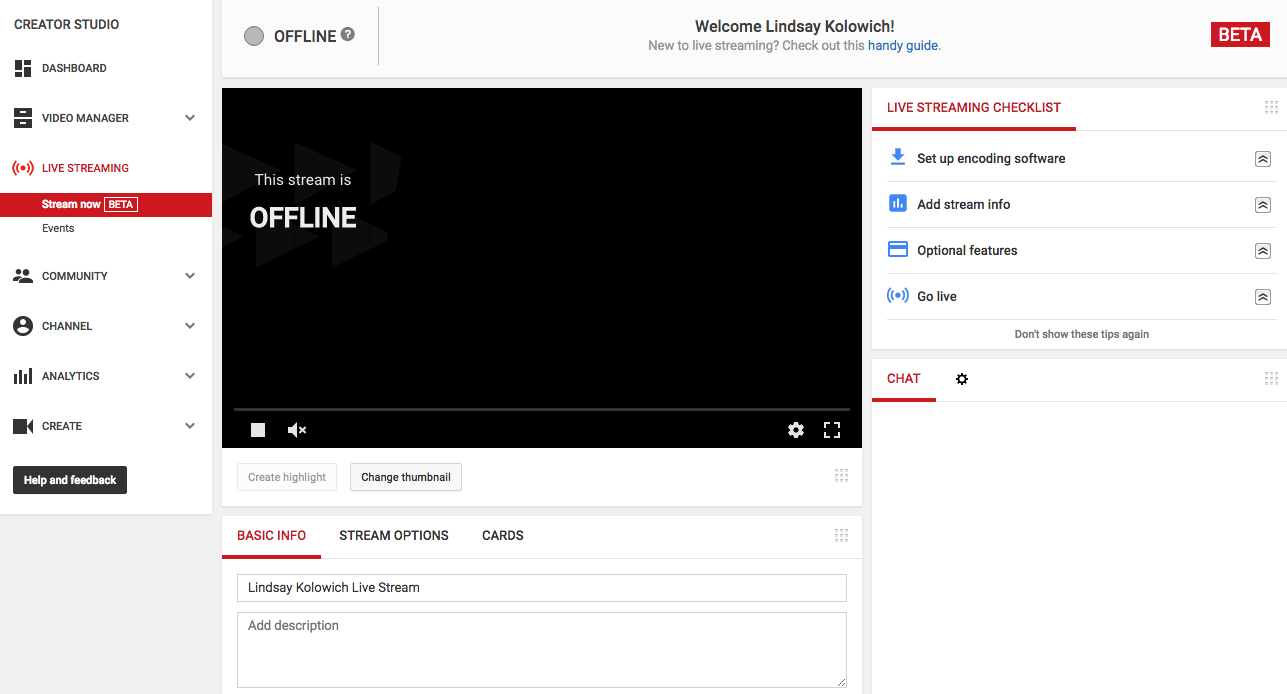
Again, you'll notice there's no "start" button on the dashboard. This is where you'll need to open your encoder and start and stop your streaming from there. Here's YouTube's Live Streaming FAQ page for more detailed information.
Live Events
Live Events gives you a lot more control over the live stream. You can preview it before it goes live, it'll give you backup redundancy streams, and you can start and stop the stream when you want.
Choose "Live Events" from your live streaming dashboard once you've enabled it. Here's what the events dashboard looks like, and you can learn more about it here.
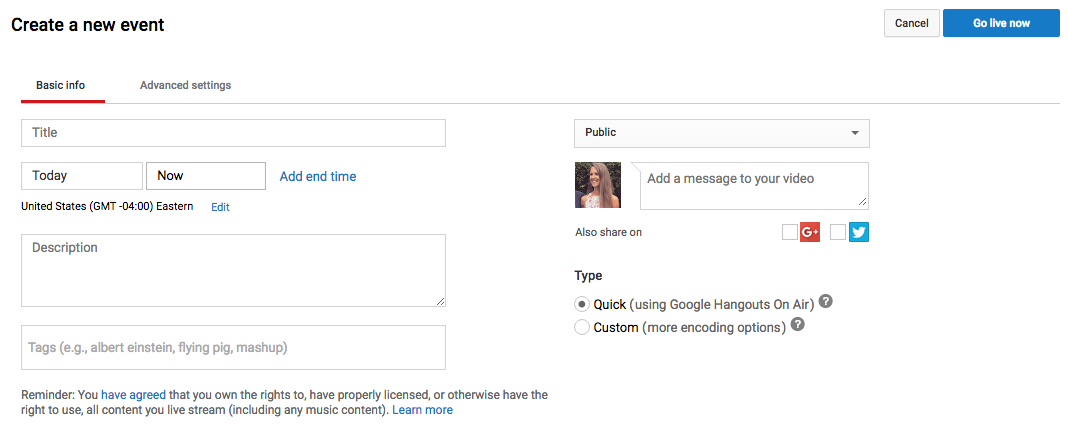
When you stop streaming, we’ll automatically upload an archive of your live stream to your channel. Note that your completed live stream videos are automatically made public on your channel by default as soon as you're done recording. To make them disappear from the public eye once you're done, you can select “Make archive private when complete” in the "Stream Options" section of your live dashboard.
Want to see what live videos others are recording on YouTube? You can browse popular YouTube videos that are live right now by clicking here.
12) You can upload and watch 360-degree videos (live and pre-recorded).
YouTube first announced their support for 360-degree videos back in March 2015, and it was a total novelty -- not to mention a game changer. Since then, brands, athletes, and other users have created some awesome 360-degree content, like this video from Samsung:
As you can see, the experience as a viewer is really, really cool. On desktop, you can click around the video to see all the different angles while the video plays. On mobile, it's even cooler: You can move your camera around to change the angle. You can browse the trending 360-degree videos here.
To actually create a 360-degree video on YouTube yourself, though, you need some serious equipment. Cameras with 360-degree capability that are compatible with YouTube are listed here on YouTube's Support page, along with how to create and upload a 360-degree video file.
What about live video in 360 degrees? That announcement would come a year after the first one, in April 2016 -- the very same week Facebook announced its own design for a 360-degree camera. Luckily for the folks at YouTube, they beat out Facebook by supporting both live video and 360-degree footage all at once.
The Verge called 360 live streamed videos "the gateway drug to virtual reality" for YouTube. Without a hefty price tag (without any price tag, for that matter, other than the time it takes to watch the ads we're already used to seeing, I have to agree. Other than the YouTube website or app, you don't need any fancy equipment to be able to watch a 360-degree live video and feel like you're basically there. Keep an eye on this.
13) YouTube ads target you based on an algorithm similar to Google and Facebook.
We've written about how Google's algorithm works, as well as how the algorithms work on Facebook, Twitter, and Instagram. But what about YouTube? How does it decide which ads play on the videos you watch?
Turns out it works a lot like Google and Facebook ads do. Like on other free sites, the advertisers help fund the YouTube experience in return for exposure to their ads. You'll see certain ads over others because of your demographic groups, your interests (which is judged in part by what you search on Google and YouTube) and the content you've viewed before, including whether or not you've interacted with the advertiser's videos, ads, or YouTube channel.
YouTube’s algorithms also try to make sure that people aren’t overloaded with ads while watching their videos -- so they actually sometimes don't know ads on monetizable videos, even when there's a demographic match.
Here are the five ad formats you can expect to see on YouTube, and how they work:
a) Display ads, which show up next to the video and only appear only on desktop and laptop computers. The advertiser gets paid when you see or click on the ad, depending on their selection.
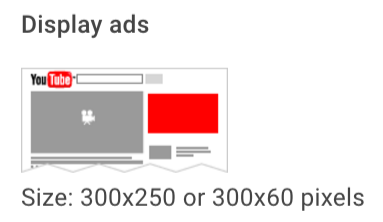
Image Credit: YouTube's Creator Academy
b) Overlay ads, which appear across the bottom 20% of the video window and currently only appears only on desktop and laptop computers. You can X out of the ad at any time.
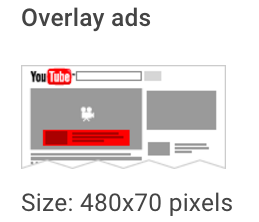
Image Credit: YouTube's Creator Academy
c) TrueView in-stream, skippable video ads, which are most common ads. These are the ones you can skip after watching for five seconds. Advertisers can put it before, during (yikes!), or after the video plays, and they get paid only if you watch at least 30 second of the clip or to the end of the video ad -- whichever comes first.
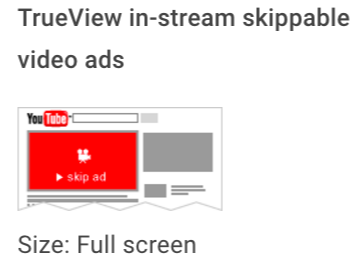
Image Credit: YouTube's Creator Academy
d) Non-skippable video ads, which are those longer, 15-or-more-second ads you see before plays and can't skip after any period of time, no matter how much you shout at your screen.
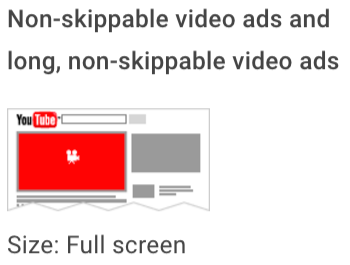
Image Credit: YouTube's Creator Academy
e) Midroll ads, which are ads that are only available for videos over 15 minutes long that are spaced within the video like TV commercials. You need to watch the ad before continuing through the video. How the advertiser gets paid depends on the type of ad: If the midroll is a TrueView ad, then you'd have to watch 30 seconds of the end or the entire ad -- whichever is shorter. If it's a CPM-based ad, then you have to watch the entire ad no matter how long it is.
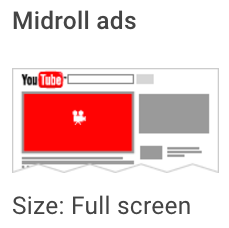
Image Credit: YouTube's Creator Academy
14) You can remove ads from YouTube videos (and watch videos offline) for 10 bucks a month.
Video ads are the reason you can watch videos for free on YouTube. It's a fact many of us have come to accept. But with YouTube's subscription service YouTube Red, that doesn't necessarily have to be true anymore.
For $9.99 a month, you can watch YouTube videos ... without any ads. And, in addition to ad-free videos, you can save videos on your mobile device and watch them in the background and/or offline, and you can use YouTube's Music App (on iOS and Android) in the background, offline, and/or on audio mode. This is not a drill.
You'd think the lure of ad-free videos would have caused more of an uproar since its launch in late 2015, especially given YouTube's domination in the music space. Surprisingly, I haven't heard much noise about it. But YouTube hasn't disclosed subscriber numbers, so it's hard to tell how well it's doing. Either way, it's good to know about -- especially if you like collecting songs and music videos like I do, but don't like when they get broken up by ads.
15) You can use Google Trends to explore and compare popular YouTube search terms over time.
You might already use Google Trends to look at the popularity of specific search terms over time. (It can be a great marketing tool for making smarter keyword choices, for instance.) But did you know you can use it to compare the popularity of YouTube search queries, specifically?
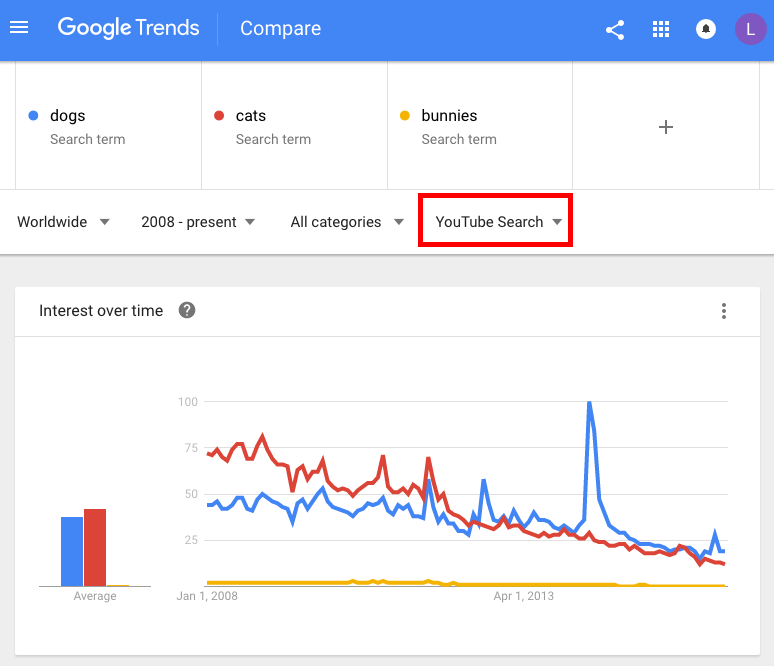
All you have to do is open Google Trends and type a search term into the "Explore topics" search bar at the top. Once that page opens up, click on "Web Search" to open a dropdown menu, and choose "YouTube Search" so it filters by YouTube searches specifically.
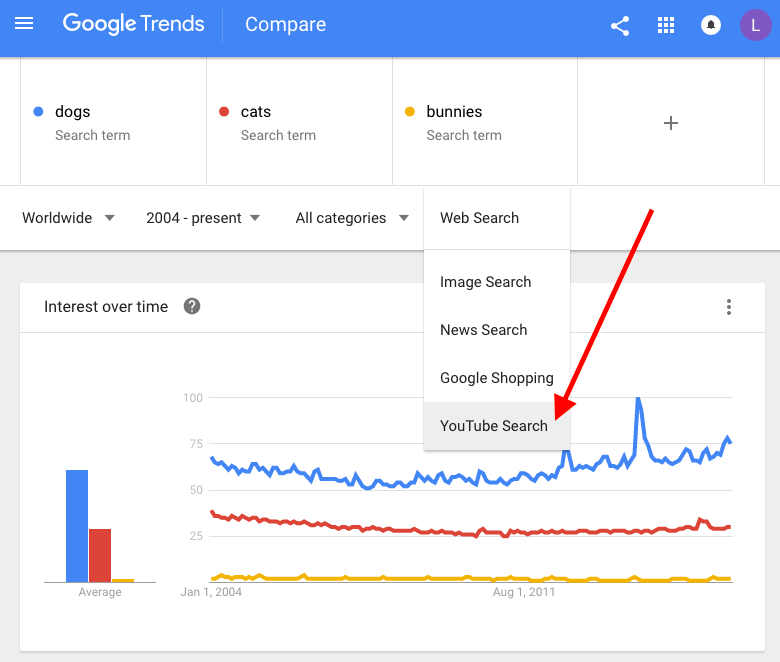
You might find that, for some search terms, the search trends are very different on Google (above) than on YouTube (below).
16) There's a "safer" version of YouTube available for your kids.
Any parent will tell you how scary it is for their kids to theoretically have access to everything public on the internet. But for your younger kids, there are ways to curb that access and have more control of what they're watching and finding -- including a kids' version of YouTube called YouTube Kids.
The folks at YouTube call YouTube Kids "a safer version of YouTube." It's not a wide-open library of online videos like YouTube is; instead, it uses filters powered by algorithms to select videos from YouTube that are safe for kids to watch. It's also totally free, thanks to ads (which are regulated as carefully as possible).
You can either turn the search feature on or off, depending whether you're cool with your kids searching for videos themselves, or if you'd rather they're limited to a certain set of videos selected by the app, along with those the app recommends based on what they’ve watched already. You can set a timer to limit how much time a child spends on the app, which I imagine is music to many parents' ears.
The algorithm is darn good -- remember, Google is YouTube's parent company -- but, as they warn in their parent's guide, "no algorithm is perfect."
17) You can learn about YouTube's copyrights terms from a cast of ridiculous puppets.
Made it this far? Here's a little reward: YouTube's "Copyrights Basics" FAQ page, which is, fittingly a YouTube video -- and features a pretty colorful cast of characters. It's actually super informative, and it looks like their video team had a lot of fun making it.
My favorite line is probably, "You know there are links on this webpage, right? You don't have to watch this." Although the chorus of gorilla puppets was pretty great, too.
Enjoy.
We hope we've opened your eyes to some of the more awesome YouTube hacks, tips, and features out there that you may not have known about. Now log on to YouTube and do some exploring yourself. The platform certainly isn't going anywhere.
Which YouTube features can you add to the list? Share with us in the comments below.
from HubSpot Marketing Blog http://blog.hubspot.com/marketing/youtube-hacks-tips-features
Via http://blog.hubspot.com/marketing/youtube-hacks-tips-features
No comments:
Post a Comment